ATON is a secure and user-friendly mobile wallet for PlatON Network and Alaya Network. The ATON Mobile Wallet allows you to easily transfer LAT/ATP tokens to others, view your transaction history and account balance. At the same time, it provides convenient delegation service for you.
Click it to download the latest version of ATON
Start
Create Wallet
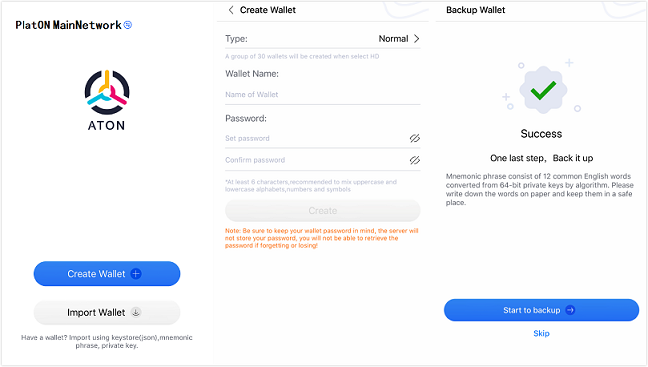

1. Click [Create Wallet].
2. Select “Normal” or “HD”. Set the wallet name, and password.
3. Click the [Create] button to create a wallet.
4. After the wallet is successfully created, you can click [Start to Backup] to start the backup, or click [Skip] to do it later.
Note
1. Password is your credentials to use and manage the wallet. Servers of ATON does not store your password,Please make sure you keep it in mind.
2. We strongly recommend you to back up your wallet after it is created.
3. Click on the network name in the upper left corner of the page to switch networks.
4. Amount of wallets cannot be larger than 200(including all normal wallets and all sub-wallets generated from HD).
Wallet Backup

1. After creating the wallet, click [Backup] button for wallet backup. Or you can find it in [My]-[Wallet Management].
2. Wallet password is reeuqired for backup. After the password verification is passed, the system will display 12 English words as the mnemonic words.
3. Copy the mnemonic and keep them in a safe place. Click [Next] to verify the mnemonic. If the verification succeeds, the wallet backup is completed.
Note
1. You can restore and manage your wallet with mnemonics words, keep them in a safe place.
Import Wallet
Import Using Keystore
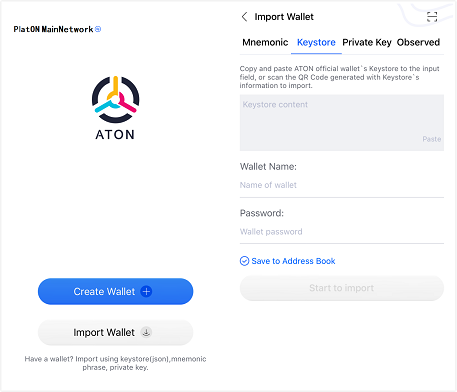
1. Click the […] button at the top right coner of the main interface, and select [Import Wallet]. Then move to [Keystore].
2. Paster Input the keystore content, or scan the QR code to get the keystore file.
3. Set the wallet name and password for this wallet.
4. Click the [Start to Import] button. After the password verification is passed, the wallet is successfully imported.
Note
1. Password is required when import ing wallet Keystore.
2. Your wallet password is not stored in the server. If you forget the password, please use mnemonic and private key to import it.
3. You can also click the “[…]” button on the top right corner to import wallet.
Import Using Mnemonics
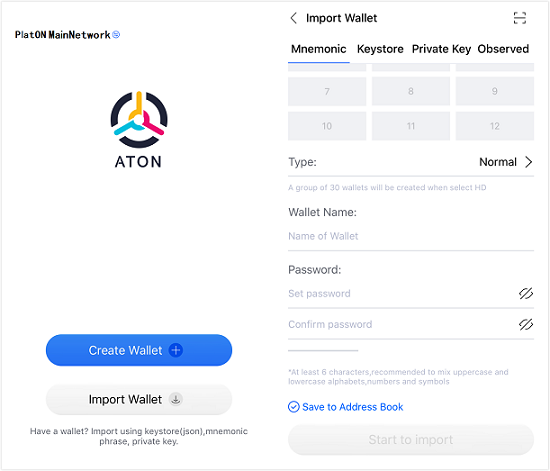
1. Click the […] button at the top right coner of the main interface, and select [Import Wallet]. Then move to [Mnemonic].
2. Fill in the mnemonics in the correct order.
3. Select type “Normal” or “HD”. Set the wallet name and password.
4. Click the [Start to Import] button. After the mnemonic verification is passed, the wallet is successfully imported.
Note
1. Password is your credentials to use and manage the wallet.Servers of ATON does not store your password, make sure you keep it in mind.
2. Store your mnemonics in a safe place.
3. You can also click the “[…]” button on the top right corner to import wallet.
Import Using Private Key
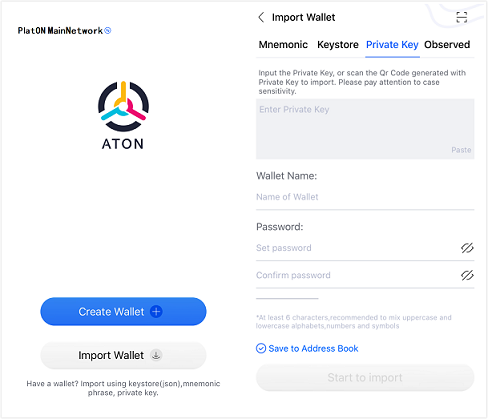
1.Click the […] button at the top right coner of the main interface, and select [Import Wallet]. Then move to [Private Key].
2. Input your private key, or scan the QR code to get the private key.
3. Set the wallet name and password.
4. Click the [Start to Import] button. After the verification is passed, the wallet is successfully imported.
Note
1. Password is your credentials to use and manage the wallet. Servers of ATON does not store your password, make sure you keep it in mind.
2. Store your private key in a safe place.
3. You can also click the “[…]” button on the top right corner to import wallet.
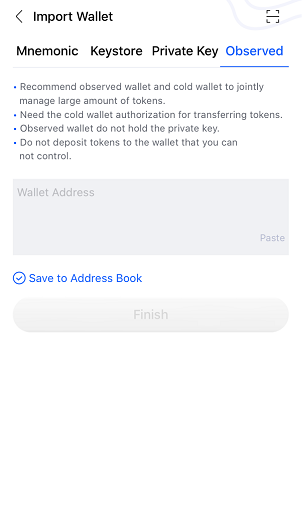
Import observed wallet
For details about importing observed wallets, please refer to the instructions of “Set observed wallet and cold wallet”.
Address Book
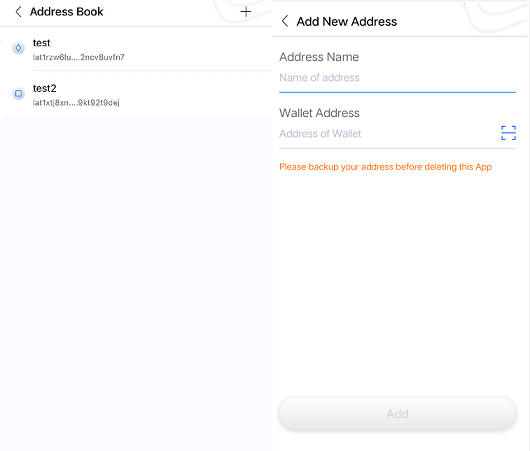
1. Select [My-Settings],and you can see the list of wallet addresses stored in the address book.
2. Click any of the address information to copy the selected address.
3. Slide any of the address information to delete and edit it.
4. Click the [+] button on the right side of the top navigation bar to manually add address information to the address book.
5. At the same time, you can also check the [Deposit Address] button above the [Start Import] button on the [Create Wallet] and [Import Wallet] pages to enable the wallet to be stored in the address book automatically, and this option is checked by default.
Select Wallet
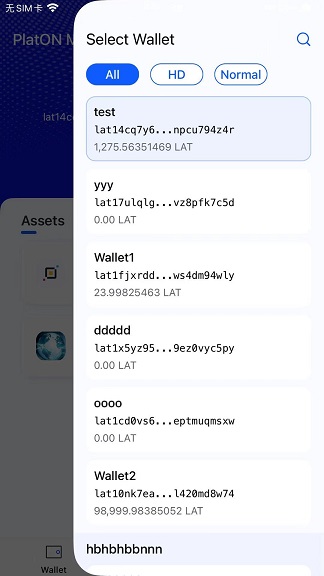
1. Click the […] button at the top right coner of the main interface, then click [Select Wallet].
2. All your wallets can be classified and filtered as “All”, “HD”, “Normal”, and you can also use fuzzy search with your wallet name or precise search with your wallet address.
3. Select the wallet you need.
4. Then you will be guide to the wallet page you selected.
Wallet Assets
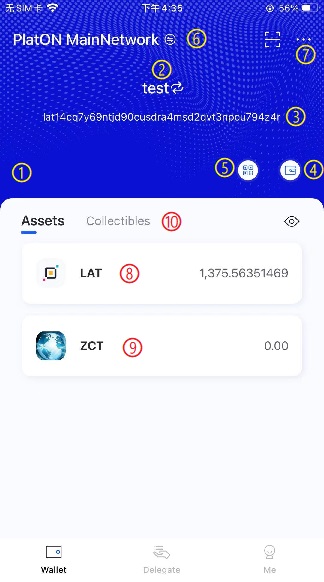
1. When you successfully created a wallet, you can find the valid wallet and asset info at the Wallet Asset page.
2. ①The upper part shows the brief information of the current wallet.
3. ②The brief wallet information includes the wallet name and wallet address,and [Switch Wallet] button.
4. ③Click the [Copy] button to copy the wallet address.
5. ④Click the [Wallet Management] button to manage the wallet.
6. ⑤The network information of the current wallet is displayed at the top left corner, click to switch networks.
7. ⑥By Click […],you can create, import and select wallets, and click “Scan” to scan the QR code.
8. The lower part of the page is [assets List].
9. ⑦The first item is the LAT data, you can see the unit and balance, click it to enter the LAT assets details page.
10. ⑧The PRC20 assets, you can see the unit and balance, click it to enter the PRC20 assets details page.
11. The “Collectibles” tab is for PRC721 assets, click on it to go to the PRC721 assets list page.
LAT Assets Detail
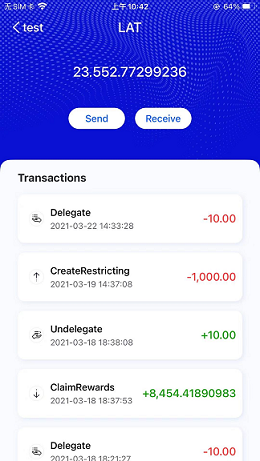
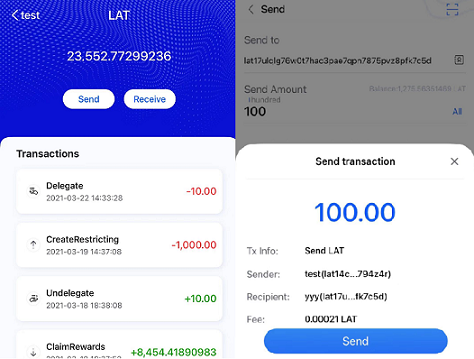
1. The upper part is the current wallet information.
2. The wallet information includes the balance, unit and locked-up balance, as well as the [Send] button and [Receive] button.
3. Click the [Send] button to jump to the sending page for transfer.
4. Click the [Receive] button to enter the receiving page to receive the transfer.
5. The lower part of the page is [Transactions].
6. The lower part of the page is the transaction records, click on a transaction record, you can get more transaction details.
Collectibles(PRC721)
Collectible Set List

Click a Collectible Set to the page of Collectible Set Detail.
Collectible Set Detail

1. At the top is the introduction about current shown Collectible Set.
2. The rest part are Collectibles belong to current wallet. Click a picture of Collectible to the page of Collectible Detail.
Collectible Detail

1. Top of this page is current collectible’s name and ID.
2. Middle part contains the detail and tradings of this collectible.
3. At the bottom is the button for sending this collectible. To send this collectible to another address on sending page by clicking this button.
Collectible Tradings’ Record

1. After clicking Recent Trading tag, you can see the list of tradings of current collectible.
2. Click one of these records to see trading detail.
Receive

1. Select the asset at the Assets parts on the main interface for more details, and click the [Receive] button to check the wallet address and QR code.
2. You can copy your wallet address with the copy button.
3. Click [Save image and Share] to save the picture to the local album.
4. Your friends can transfer LAT to you through your wallet address or scanning the QR code.
Note
1. This LAT address and QR code only accept LAT the assets on PlatON, do not deposit the assets on other networks to this purse wallet.
2. Please make sure you deposit the assets to correct network before starting.
Sending
Send LAT
1. Click the [Send] button at the asset details page you selected.
2. Enter a valid wallet address, or scan the QR code by clicking the scan button at the upper right corner of the interface, or select one wallet you stored.
3. Enter the LAT amount you want to send.
4. Set Select the transaction fee rate, you can move the slide bar to set the service fee.
5. Click [Next] to confirm the transaction information,click [Send] to proceed the transaction.
Send Collectible

1. On the page of Collectible Detail, click the [Send] button.
2. Type in valid wallet address, or scan the QR code of the wallet to automatically fill in the address, or select a locally saved wallet address through the address book.
3. Choose the transaction fee, and you can click to adjust it to be lower or higher.
4. Click the [Next] button to confirm the transaction information, and click the [Send Transaction] button and enter the correct wallet password to send the transaction to the blockchain network.
Choose Transaction Fee
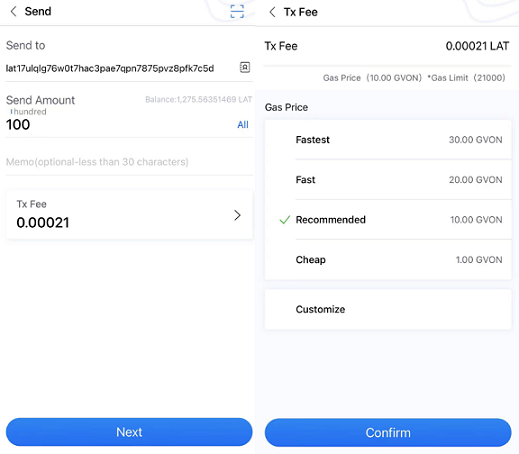
1. The functions of sending, entrusting, redeeming and receiving rewards all incur transaction fees.
2. Take the sending function as an example, click [Transaction Fee] to enter the transaction fee setting page.
3. There are 5 choices for transaction fees (Fastest, Fast, Recommended, Cheap, Customize).
4. [Recommended] configuration item is selected by default.
5. The user can select the corresponding option according to actual needs.
6. In the [Customize] column, users can enter Gas Price and Gas Limit independently to achieve flexible cost configuration.
Validators
Validators List

1. Move to the [Delegate] tab at the main interface, and then opt for [Validators], you can view all validators.
2. Usually, the nodes are sorted by rank. They can also be sorted by Delegated amount/Delegators/Expected delegation annualized yield.
3. Active node: validators participating in the consensus election in the current settlement interval.
4. Candidate node: validators do not participate in consensus election in the current settlement interval.
Validator Details

1. Select a validator, you can check the related profit informaiton, like expected delegation annualized yield, reward ratio and total reward.
2. Also you can check the basic information of validators, such as delegators, blocks info, etc.
3. If you want to delegate your LAT to this validator, you can click the [Delegate] button to start it.
Note:
1. The validators funded by Foundation do not accept delegations.
2. The “locked validators” not accept delegation.
Delegate
Participate in Delegation
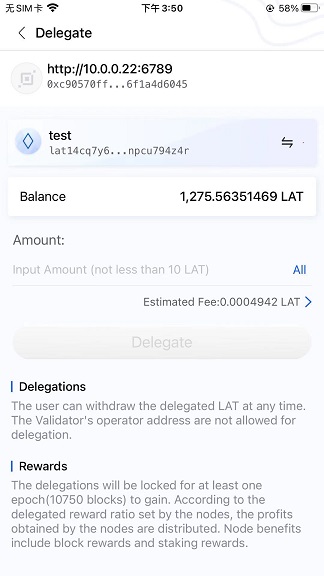
1. Select a validator to delegate. If you’ve delegated, then you can check your delegation details via: [Delegate] – [My Delegations]-[Delegation Rec], and then select one validator to continue delegation.
2. Select the wallet you want to delegrate.
3. You can select locked-up balance to delegate if there is.
4. Enter the amount, and it must not be less than 10LAT.
5. Enter the correct password.
6. You can delegate to the nodes you’ve delegated, no limit to the delegation times.
Note
1. Delegators delegates LAT to validtaors, when the delegated validators get profit, delegators will win the profits according to the delegation ratio set by validators.
2. The wallet address connected to profit validators can’t be used to delegate.
3. The delegated LAT will be valid at the next settlement interval.
My Delegations
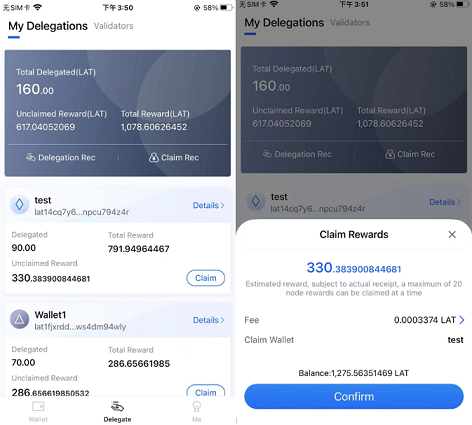
1. Click [My Delegation] to check your uncalmied reward, total reward and delegated amount.
2. Select a specific wallet to check the details including total delegated amount, total rewards and unclaimed rewards. You can also delegate and withdraw your delegation.
3. Click the [Claim] button to get all unclaimed rewards, and input your wallet. After that, you can see your rewards.
Withdraw Delegation
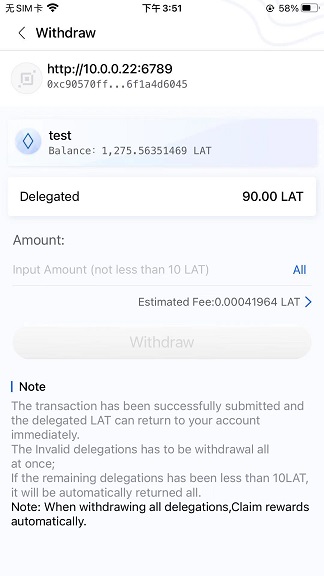
1. Click You can withdraw your delegation via: [My Delegations]-[Delegation Rec]-[Withdraw].
2. Enter the number,it should be greater than or equal to 10 LAT. Enter your password to proceed the process.
Note
1. Your delegated LAT will be back to your wallet immediately after you withdraw the delegation successfully.
2. When withdrawing all delegations, the delegation rewards will be claimed automatically.
Observed Wallet and Cold Wallet
Set the Observed Wallet and Cold Wallet
Preparation:
- Prepare two mobile phones and install the latest ATON.
- Make sure that one phone is never connected to the Internet. It is recommended to turn on the airplane mode and turn off WiFi to set it as a cold wallet device. The other one is connected to the network as an observed wallet device.
1. Create a wallet as a cold wallet in offline environment, click [ Receive] to find the QR code.
2. Click […] at the upper right corner of the main interface, and then select [Import Wallet] -[Observe Wallet] with the mobile phone connected to the network, scan the wallet QR code or enter the wallet address on the mobile phone not connected to the Internet, and click [Finish]. Then the wallet is set successfully.
Note
1. Oberseved wallet: a wallet connected to network, and is used for observation only. If you need to conduct transactions,the observed wallet need to work with the cold wallet.
2. Cold wallet:a wallet that is not connected to the Internet but has a private key, which needs to be kept in a safe place.
Transaction with Cold Wallet
If you have set up observed wallets and cold wallets, you can initiate transfers, delegations, delegation withdrawals, etc. with the observed wallets, and have it worked with the cold wallets cooperate for sign. The following Below is an example.
1. Observed wallet
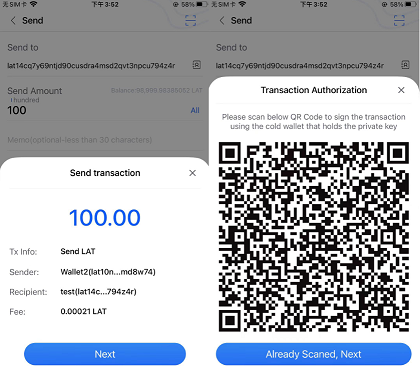
(1) Select an observed wallet, then move to the send page, enter the required trasfer details, and then click Finish.
(2) Click the [Next] button, then you will find the QR code that would be scanned by the cold wallet.
2. Cold wallet
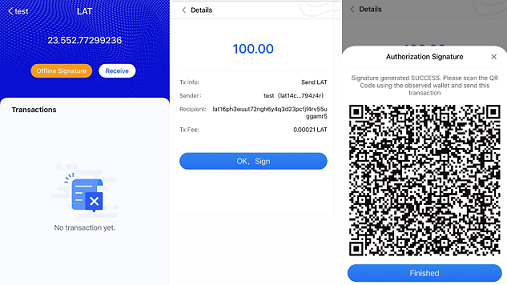
(1) Click the scan button at the upper right corner, or click the [Offline Signature] button of the specified wallet to scan the QR code displayed on the wallet page.
(2) The page displays the detailed transaction information. If there is no problems with the transaction, you can click [Next] and enter the password.
(3) After you can see the QR code of the signed transactions for the observed wallet to scan.
3. Observed wallet
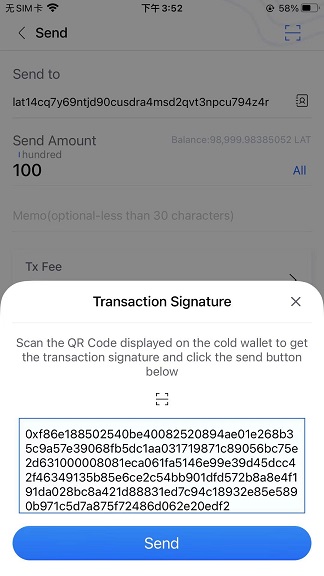
(1) The offline signature is requied when you use observed wallet to send, delegate and withdraw.
(2) Click [Next], then you will arrive at the reading signature data page.
(3) Click [Send Transaction] to send the transaction to the blockchain network.
Note
1. Jointly use observed wallet and cold wallet to do transactions.
2. Please do not deposit assets to the observed wallet address that you cannot control.
Others
Settings / Help and Feedback


1. Move to [Me] – [Settings], you can make
– Network Settings: Select the network to be connected.
– Reminder Threshold:Send notification when the amount of transfer exceeds the transaction threshold you set.
– Resend Reminder:Send notification when repeated transaction occurred within 2 housrs.
– Fingerprint / Face Unlocking: If you enable it, fingerprint or face unlock is required every time you launch the app.
– Language: Chinese and English are available.
2. Move to [Me] – [Support and feedback], You can find the user guide and Q &A. If you can’t find what you want, you can submit it and we will respond as soon as possible.
Change Password


1. Move to [Me] – [Wallet Management] – [Change Password].
2. Input the original password and click Confirm.
3. Set new password and click Confirm.
4. Click the [Confirm] button,then the wallet’s password is successfully changed.
Note
1. Password is your credentials to use and manage the wallet. Servers of ATON does not store your password, make sure you keep it in mind.
This article is reproduced from https://devdocs.platon.network/docs/en/ATON-user-manual/