Author lzb
Introduction
ATON 1.1.0 Version has already supported walletconnect protocol. Users can realize the connection and transaction signature with DApp on the premise of ensuring that the private key does not leave the mobile device and is not exposed to DApp. In this chapter we will transform the Digging of browser version to realize the transfer function through WallectConnect.
What is WalletConnect
WalletConnect is an open protocol for secure communication between DApps and wallets. The protocol establishes a remote pairing between two applications and / or devices, and transmits the actual data through the Bridge server. Two peers share the secret key to encrypt the data symmetrically. Pairing is initiated by the party displaying the QR code or with the standard WalletConnect URI address, and is established when the other party agrees to the pairing request.
As a DApp developer, you need to know the basics of WalletConnect integration. Then, according to this tutorial, you can let users generate a transaction request to be signed in DApp and send it to ATON wallet through walletconnect for signature.
Hao to Develope
First, the two buttons to connect WalletConnect and Send Transaction need to be provided in DApp to establish a connection and send a transaction.首先需要在 DApp 里提供连接 WalletConnect 和 sendTransaction 两个按钮,用于建立连接和发送交易。
The sample code of this tutorial is available for reference on PlatON WalletConnect Example
1. DAPP Integrated Walletconnect Protocol
First, a QR code in the standard WalletConnect URI format (EIP-1328) needs to be generated in DAPP for subsequent scanning and connection of ATON wallet (relevant UI components have been provided in the WalletConnect official library).
Click the button, DAPP will establish a connection to execute the walletConnectInit method
Install
- yarn
yarn add @walletconnect/client @walletconnect/qrcode-modal
- npm
npm install @walletconnect/client @walletconnect/qrcode-modal
It is recommended that developers pay attention to the official update of walletconnect-monorepo so that DAPP has the latest functions and performance improvements.
WalletConnect Bottom
<SButtonContainer>
  <SConnectButton left onClick={this.walletConnectInit} fetching={fetching}>
    {"Connect to WalletConnect"}
  </SConnectButton>
</SButtonContainer>
Establish WalletConnect connection
import WalletConnect from "@walletconnect/client";
import QRCodeModal from "@walletconnect/qrcode-modal";

walletConnectInit = async () => {
  // bridge url
  const bridge = "https://bridge.walletconnect.org";

  // create new connector
  const connector = new WalletConnect({ bridge, qrcodeModal: QRCodeModal });

  await this.setState({ connector });

  // check if already connected
  if (!connector.connected) {
    // create new session
    await connector.createSession();
  }

  // subscribe to events
  this.subscribeToEvents();
};
subscribeToEvents would monitor the relatied events of connector defined by walletConnectInit 定义好的 connector. connector API
subscribeToEvents = () => {
  const { connector } = this.state;

  if (!connector) {
    return;
  }

  // 当DApp连接上钱包后,若钱包的信息发生变化(大部分情况是 chainId 或者 address),会触发 session_update 的回调
  connector.on("session_update", async (error, payload) => {
    console.log(`connector.on("session_update")`, payload);

    if (error) {
      throw error;
    }

    const { chainId, accounts } = payload.params[0];

    // 通过 payload.params 拿到 accounts 和 chainId,对 DApp 的 state 进行更新
    this.onSessionUpdate(accounts, chainId);
  });

  connector.on("connect", (error, payload) => {
    console.log(`connector.on("connect")`, payload);

    if (error) {
      throw error;
    }

    this.onConnect(payload);
  });

  connector.on("disconnect", (error, payload) => {
    console.log(`connector.on("disconnect")`, payload);

    if (error) {
      throw error;
    }

    this.onDisconnect();
  });

  // 如果已经连接,则 walletConnectInit 执行后不会唤起二维码弹框,只需进行 DApp 的 state更新
  if (connector.connected) {
    const { chainId, accounts } = connector;
    const address = accounts[0];
    this.setState({
      connected: true,
      chainId,
      accounts,
      address,
    });
    this.onSessionUpdate(accounts, chainId);
  }

  this.setState({ connector });
};
Notice:The react hook is not used in the example, so if you want to transform
await this.setState()in the code to hook,it It is necessary to carding the state and Updated logic of DApp.
2. Establish connection with ATON
- Aton wallet can establish a connection by scanning the QR code inWalletConnect URI format after step 1. After reading the URI, it will immediately receive and decrypt the connection request data. The wallet will then show the user the request details provided by DApp. As follows:
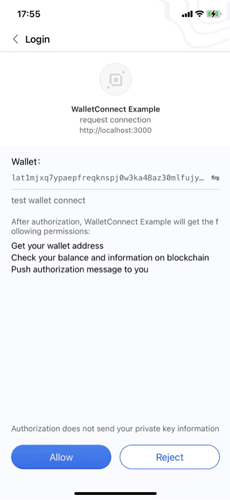

- The user will approve or reject the connection.
If it is rejected, ATON would initiates a rejection request and DAPP will enter the disconnect event and will immediately disconnect from the bridge server. At this time, error handling and prompt can be carried out according to the message of payload
payload: {
  event: "disconnect";
  params: [{ message: "Session update rejected" }];
}
If approved, ATON will display the information of successful connection, DApp will enter the connect event, and will receive the provided account and chainid from the payload returned by the wallet.
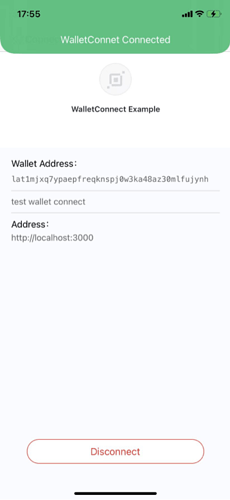
payload: {
  event: "connect"
  params: [
    accounts: ['0xdc8c0f103dc8523c82d38064f746dda9fa28bf7f']
    chainId: 210309
    peerId: "BC246E88-ACC0-4FD6-BF10-DEF314EF42BE"
    peerMeta: {description: "hello,i'm Platon.", icons: Array(0), name: 'ATON', url: 'https://safe.gnosis.io'}
  ]
}
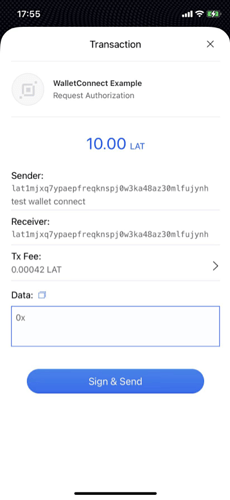
3. Transaction Signature
Once the connection is established, DApp will be able to send any JSON-RPC call request processed by the wallet to read data from its node or issue a signature request for a transaction or message.
Send Bottom
<Button onClick={this.send}>Send</Button>
Generate transaction signature request
sendTransaction = async () => {
  const tx = {
    from,
    to,
    nonce,
    gasPrice,
    gasLimit,
    value,
    data,
  };

  // send transaction
  const result = await connector.sendTransaction(tx);

  console.log("connector.sendTransaction result txHash: ", result);
};
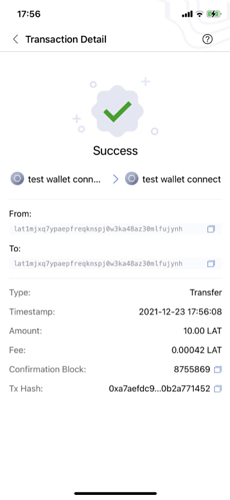
Display of transaction results
After obtaining txHash, you can provide browser links and transaction details on DApp
// format displayed result
const formattedResult = {
  method: "eth_sendTransaction",
  txHash: result,
  from: address,
  to: address,
  value: "0 ETH",
};

// display result
this.setState({
  connector,
  result: formattedResult || null,
});
Conclusion
Following these three steps, you can establish a connection with ATON in DApp and send a transaction signature request through sendTransaction provided by WalletConnect.按照这三个步骤,就可以在 DApp 里和 ATON 建立连接,并通过 WalletConnect 提供的 sendTransaction 发送交易签名请求。
Vedio Demo
This article is reproduced from https://forum.latticex.foundation/t/topic/5945