Author Dex_DQT
In this chapter we will learn how to build functions to switch wallets and switch networks. it’s the last chapter of the Android chapter.
Add a Pop-Up Box to Jump to the Page of Add Wallets on Main Page
The layout of the pop-up box can be found in
res/layout/dialog_assets_more.xml
Then add PopupWindowUtil under the util package, with the following code:
public class PopupWindowUtil {
    public static PopupWindow Show(View contentView, View anchorView) {

        return Show(contentView, anchorView, 0, 0);
    }

    /**
     * @param contentView 弹出框的内容
     * @param anchorView  停靠对象
     * @param xOffset     停靠X偏移
     * @param yOffset     停靠Y偏移
     * @return
     */
    public static PopupWindow Show(View contentView, View anchorView, int xOffset, int yOffset) {
        // 创建popwindow实例
        final PopupWindow popupWindow = new PopupWindow(
                contentView,
                ConstraintLayout.LayoutParams.WRAP_CONTENT,
                ConstraintLayout.LayoutParams.WRAP_CONTENT,
                true);
        // 设置阴影
        popupWindow.setElevation(3);

        popupWindow.setTouchable(true);
        // 计算出指定view的位置
        int[] windowPos = calculatePopWindowPos(contentView, anchorView);

        popupWindow.setElevation(3);

        windowPos[0] -= xOffset;
        windowPos[1] += yOffset;
        //  设置弹出框的位置
        popupWindow.showAtLocation(anchorView, Gravity.TOP | Gravity.START, windowPos[0], windowPos[1]);
        return popupWindow;
    }

    private static int[] calculatePopWindowPos(final View contentView, final View anchorView) {
        final int[] windowPos = new int[2];
        final int[] anchorLoc = new int[2];
        // 获取锚点View在屏幕上的左上角坐标位置
        anchorView.getLocationOnScreen(anchorLoc);
        final int anchorHeight = anchorView.getHeight();
        // 获取屏幕的高宽
        final int screenHeight = ViewUtil.INSTANCE.GetScreenHeight();
        final int screenWidth = ViewUtil.INSTANCE.GetScreenWidth();
        contentView.measure(View.MeasureSpec.UNSPECIFIED, View.MeasureSpec.UNSPECIFIED);
        // 计算contentView的高宽
        final int windowHeight = contentView.getMeasuredHeight();
        final int windowWidth = contentView.getMeasuredWidth();
        // 判断需要向上弹出还是向下弹出显示
        final boolean isNeedShowUp = (screenHeight - anchorLoc[1] - anchorHeight < windowHeight);
        if (isNeedShowUp) {
            windowPos[0] = screenWidth - windowWidth;
            windowPos[1] = anchorLoc[1] - windowHeight;
        } else {
            windowPos[0] = screenWidth - windowWidth;
            windowPos[1] = anchorLoc[1] + anchorHeight;
        }
        return windowPos;
    }
}
Then add the code to pop-up the page in initEvent of page/AssetPage:
private fun initEvent() {
... 省略代码
        // 显示弹出框
        binding.assetsAdd.setOnClickListener {
            popWindow = PopupWindowUtil.Show(assetMoreDialog.root, binding.assetsAdd)
        }

        // 跳转到创建钱包页面
        assetMoreDialog.createWallet.setOnClickListener {
            DXRouter.JumpTo(itemView.context, CreateWalletActivity::class.java)

            popWindow.dismiss()
        }

        // 跳转到导入钱包页面
        assetMoreDialog.importWallet.setOnClickListener {
            DXRouter.JumpTo(itemView.context, ImportActivity::class.java)

            popWindow.dismiss()
        }
... 省略代码
}
The page would look like this:
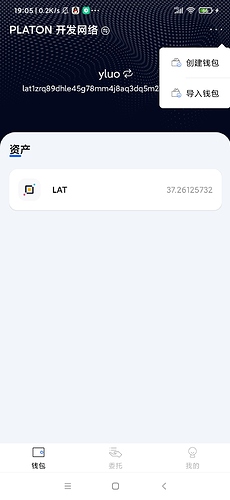

Then we could import multiple wallets.
Writing the function of wallets switching
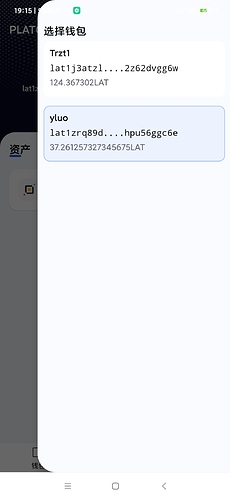
Change the outermost layout of res/layout/activity_main.xml to DrawerLayout, and display the select wallet menu in the right side slider menu.
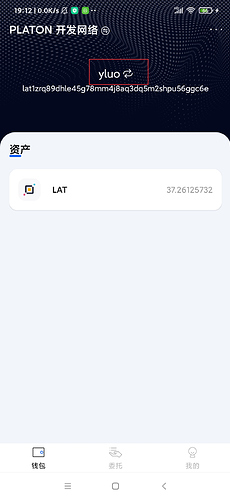
Then write the item for the select wallet menu, you can check the code in res/layout/item_sidebar_wallet_list.xml. Here the wallet list is displayed using the RecyclerView control, the corresponding Adapter is the Right Side Wallet List Adapter class under the adapter package. Then click on the wallet name on the main page to display the side menu, as below:
Because the side-slider menu is in the MainActivity and is not displayed on the same page as the main page, events need to be passed between pages. I used EventBus to do this. The pop-up effect is shown below:
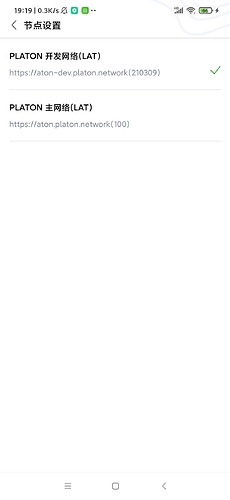
Create a Page for Node Selection
You can refer to res/layout/activity_node_settings.xml to get the layout, and the corresponding Activity is NodeSettingsActivity. add the code for node management in the NodeManager under the service package:
object NodeManager {


    private val nodeList = ArrayList<NodeInfo>()

    private lateinit var curNodeInfo: NodeInfo

    private var curNodeIndex: Int = 0


    fun GetNodeStatusDescRes( nodeStatus: String?, isConsensus: Boolean?): Int {
        return when (nodeStatus) {
            NodeStatus.ACTIVE -> if (isConsensus != null && isConsensus)  {
                R.string.validators_verifying
            } else {
                R.string.validators_active
            }
            NodeStatus.CANDIDATE -> R.string.validators_candidate
            NodeStatus.LOCKED -> R.string.validators_locked
            NodeStatus.EXITING -> R.string.validators_state_exiting
            NodeStatus.EXITED -> R.string.validators_state_exited
            else -> R.string.unknown
        }
    }

    fun LoadNodeConfig() {
        nodeList.add(
            NodeInfo(
                nodeName = "PLATON 开发网络",
                hrp = "LAT",
                nodeUrl = "http://35.247.155.162:6789",
                chainId = 210309,
                atonUrl = "https://aton-dev.platon.network",
                themeColor = "#04081f",
                isSelected = false
            )
        )

        nodeList.add(
            NodeInfo(
                nodeName = "PLATON 主网络",
                hrp = "LAT",
                nodeUrl = "https://samurai.platon.network",
                chainId = 100,
                atonUrl = "https://aton.platon.network",
                themeColor = "#0912D4",
                isSelected = false
            )
        )
        // 设置

        val context = DiggingApplication.context

        val sp = context.getSharedPreferences("nodeInfo", Context.MODE_PRIVATE)
        curNodeIndex = sp.getInt("nodeIndex", 0)

        curNodeInfo = nodeList[curNodeIndex]
    }


    fun GetNodeInfoByIndex(position: Int): NodeInfo {
        return nodeList[position]
    }

    fun GetNodeNum(): Int {
        return nodeList.size
    }

    fun GetCurNodeIndex(): Int {
        return curNodeIndex
    }

    fun GetCurNodeInfo(): NodeInfo {
        return curNodeInfo
    }

    fun SwitchNode(index: Int) {
        curNodeInfo = nodeList[index]
        curNodeIndex = index
        ThreadPoolUtil.AddTask {
            val context = DiggingApplication.context
            val sp = context.getSharedPreferences("nodeInfo", Context.MODE_PRIVATE)
            val editor = sp.edit()
            editor.putInt("nodeIndex", index)
            editor.commit()
        }
    }
}
Here I have added the node information for both the test network and the main network, and the node address for the main network is used directly from samurai.
The effect of the page is shown below:
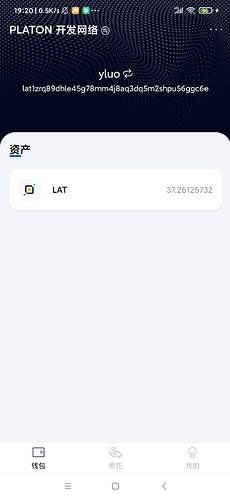
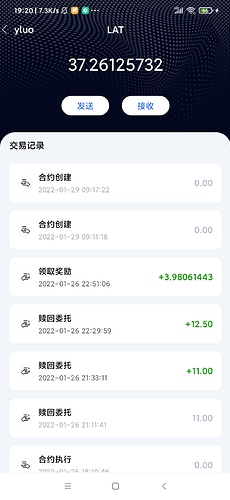
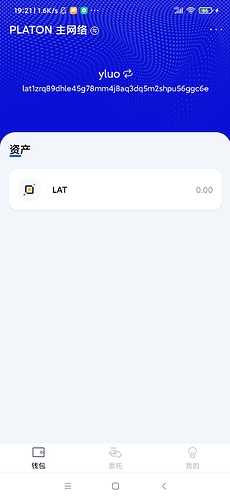
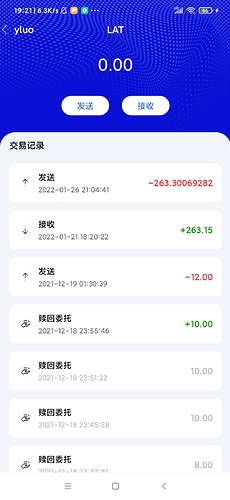
These are the screenshots of the wallet on the test and main networks with adress of lat1zrq89dhle45g78mm4j8aq3dq5m2shpu56ggc6e:
The Main Page of Test Networek
Transaction History of Test Networek
The main page of the main network
The Transaction History of main page
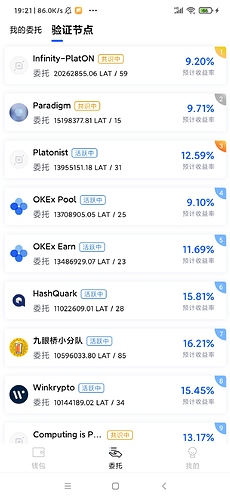
The Authentication Node List for the Main Network
Well, that’s the end of the Andorid section. The rest of the interface does not involve Platon’s knowledge, you just need to master Android’s knowledge to build it, so I won’t explain it anymore.
Review the main content of this presentation:
1
1, Communication with nodes via json-rpc
2, Manually invoke the smart contract and parse the return to implement the delegate/redemption delegate/reward delegate functions
3, Calling ATON’s Api interface to obtain
In the next article we’ll start with the Fluter application. As this series of articles is aimed at teaching how to build PlatON applications, we will not go into the basics of the application itself, so you will need to know the basic usage of Flutter beforehand.
The URL of github: https://github.com/DQTechnology/Platon_DevGuideProject
Publisher:,Please indicate the source for forwarding:https://platonworld.org/?p=7004