Author Dex_DQT
We’ll split into two chapters to explain how to build delegate functionality. This chapter teaches how to implement the functionality to get a list of validation nodes and delegates, and how to write your own code to call smart contracts.
Create Commission Page
The delegate page appears as a main page of activity_main and is divided into two sub-pages, “My Delegates” and “Validation Node“.
We start by building the delegate page. See the res/layout/page_delegate.xml file for the layout code.
Then create the DelegatePage class under the page package, with the following code:
class DelegatePage(itemView: View) : BaseViewHolder(itemView) {
    private val binding: PageDelegateBinding = PageDelegateBinding.bind(itemView)
    init {
        initUI()
    }
    private fun initUI() {
        //设置顶部的状态栏高度
        ViewUtil.SetStatusBarMargin(binding.stbBar)

        // 设置tab选项
        var indicatorThickness = DensityUtil.DP2PX(itemView.context, 2.0f)
        binding.stbBar.setIndicatorThickness(indicatorThickness + 4)
        indicatorThickness += 4
        binding.stbBar.setIndicatorCornerRadius(indicatorThickness / 2.0f)
        val titleList = ArrayList<String>(2)
        // 添加资产选项
        titleList.add(ResourceUtil.GetString(R.string.tab_my_delegate))
        // 添加资产选项
        titleList.add(ResourceUtil.GetString(R.string.tab_validators))
        binding.stbBar.setCustomTabView { container, title -> getTableView(container, title) }
        binding.vpContent.adapter = DelegatePageAdapter()
        binding.stbBar.setViewPager(binding.vpContent, titleList)
    }
    private fun getTableView(container: ViewGroup, title: String): View? {
        val inflater = LayoutInflater.from(container.context)
        val tabBinding = LayoutAppTabItem3Binding.inflate(inflater, container, false)
        tabBinding.tvTitle.text = title

        return tabBinding.root
    }
}
Then add the code for creating the page in the adapter/MainPageAdapter class:
    override fun onCreateViewHolder(parent: ViewGroup, viewType: Int): BaseViewHolder {
        val inflater = LayoutInflater.from(parent.context)

        return when (viewType) {
            0 -> {
                // 钱包页面
                AssetPage(PageAssetsBinding.inflate(inflater, parent, false).root)
            }
            1 -> {
                // 委托页面
                DelegatePage(PageDelegateBinding.inflate(inflater, parent, false).root)
            }
            else -> {
                throw RuntimeException("无法识别页面类型")
            }
        }
    }
Next we create the My Delegate page (see res/layout/page_my_delegate.xml for the layout code), here I use the RecyclerView control to display the content, the page looks like this:


Refer to res/layout/item_total_delegated.xml for the item layout codeof the total delegate; refer to res/layout/item_empty_delegate_tip.xml for that of the prompt; refer to res/layout/item_my_delegate_list.xml for thecode ofthat of the wallet delegate details.
Next we write the code to get the delegate information. In the JavaScript chapter, we get the delegate information directly from the PlatON node, but this is a limited way of getting information, so this time we call the ATON interface for getting the information.
Create the logic class MyDelegatePage for the delegate page in the page package.
I will explain the code for getting the wallet delegate information from the ATON backend, but the rest of the code is basically basic Andorid development functionality, so I won’t go into it here. The code to get the delegate information is as follows:
    private suspend fun loadData() {

        val walletAddrs = ArrayList<String>()
        /**
         * 获取所有的钱包地址
         */
        walletAddrs.addAll(WalletManager.GetAllWalletAddress())
        val myDelegateTO = MyDelegateTO(walletAddrs)
        // 获取钱包信息
        val delegateInfoRsp = AtonApi.GetMyDelegateList(myDelegateTO)
        // 获取委托节点详情
        adapter.UpdateData(delegateInfoRsp.data)

        binding.refresher.finishRefresh(true)
    }
AtonApi.GetMyDelegateList
By looking at the source version of the ATON source code, we can see that the interface adress for getting the wallet delegate information is:
/app/v0760/node/listDelegateGroupByAddr,
And the backend address of the test network ATON is: https://aton-dev.platon.network
The parameter for calling this interface is:
data class MyDelegateTO(
    val walletAddrs: List<String>
)
As we know from the structure, this parameter is the array of wallet addresses, which returns the delegate details for each wallet. The field description is as follows:
@JsonIgnoreProperties(ignoreUnknown = true)
class DelegateInfo {
    /**
     * 钱包名称
     */
    var walletName: String? = null
    /**
     * 钱包地址
     */
    var walletAddress: String? = null
    /**
     * 钱包头像
     */
    var walletIcon: String? = null
    /**
     * 累计的奖励  单位von   1LAT(ETH)=1000000000000000000von(wei)
     */
    var cumulativeReward: String? = null
    /**
     * 待领取的奖励,单位von
     */
    var withdrawReward: String? = null
    /**
     * 总委托  单位von   1LAT(ETH)=1000000000000000000von(wei)
     */

    var delegated: String? = null

    /**
     * 是否正在pending
     */
    var isPending: Boolean = false

    /**
     * 是否是观察者钱包
     */

    var isObservedWallet: Boolean = false

    fun setIsObservedWallet(isObservedWallet: Boolean) {
        this.isObservedWallet = isObservedWallet
    }

    fun setIsPending(isPending: Boolean) {
        this.isPending = isPending
    }
}
Note that we need to manually enter the set and get methods for the fields beginning with is, otherwise an error will be reported.
To calculate the total number of delegates, you need to add up the delegate information of each wallet, the specific UI display code is in the MyDelegateAdapter class of the adapter package. The code to calculate the total delegate LAT, total pending rewards and accumulated rewards is as follows:
   fun UpdateData(delegateList: List<DelegateInfo>?) {
        totalDelegateLAT = BigInteger("0")
        canWithdrawReward = BigInteger("0")
        cumulativeReward = BigInteger("0")

        delegateList?.forEach {
            if (it.delegated != null) {
                totalDelegateLAT = totalDelegateLAT.add(it.delegated!!.toBigInteger())
            }
            if (it.withdrawReward != null) {
                canWithdrawReward = canWithdrawReward.add(it.withdrawReward!!.toBigInteger())
            }
            if (it.cumulativeReward != null) {
                cumulativeReward = cumulativeReward.add(it.cumulativeReward!!.toBigInteger())
            }
        }
        this.delegateNodeList.clear()
        if (delegateList != null) {
            this.delegateNodeList.addAll(delegateList)
        }
        notifyDataSetChanged()
    }
The page effect is as follows:

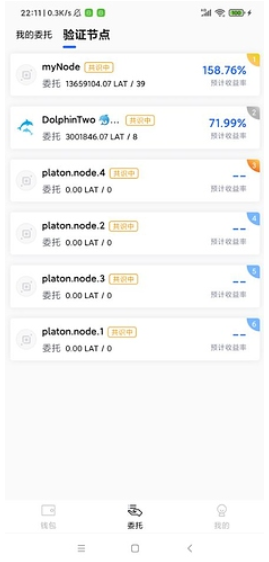
Then write the validation node page.
See res/layout/page_validator.xml for the layout code and res/layout/item_validator_list.xml for the corresponding item layout code.
The logical code file for the validation nodes is the ValidatorPage under the page package, here we explain the interface to get the list of validation nodes. The address of this interface as found in ATON is : /app/v0760/node/nodelist
This interface has no parameters and can be used to obtain all interfaces at once. If you need to distinguish between active and candidate nodes, as in the latest version of ATON, you will need to do so yourself based on the status of each node. The structure image the interface returns is as follow:
@JsonIgnoreProperties(ignoreUnknown = true)
class VerifyNode {
    /**
     * 节点ID
     */
    var nodeId: String? = null

    /**
     * 质押排名
     */

    var ranking: Int = 0

    /**
     * 节点名称
     */
    var name: String? = null
    /**
     * 节点头像
     */
    var url: String? = null

    /**
     * 预计年化率
     */

    var delegatedRatePA: String? = null

    /**
     * 竞选状态
     * Active —— 活跃中
     * Candidate —— 候选中
     * Locked —— 锁定中
     */
    var nodeStatus: String? = null
    /**
     * 是否为链初始化时内置的候选人
     */
    var isInit: Boolean = false

    /**
     * 是否共识中
     */
    var isConsensus: Boolean = false
    /**
     * 总押金
     */
    var delegateSum: String? = null

    /**
     * 委托者数
     */
    var delegate: String? = null

    fun setIsConsensus(isConsensus: Boolean) {
        this.isConsensus = isConsensus
    }

    fun setIsInit(isInit: Boolean) {
        this.isInit = isInit
    }
}
The page will as follows:
Create the Commission Sending Page
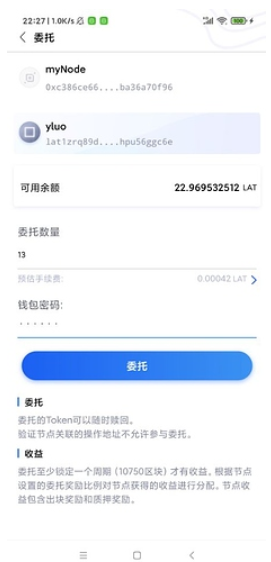
To send the delegate, refer to res/layout/activity_delegate.xml for the page layout code, The effect is as follows:

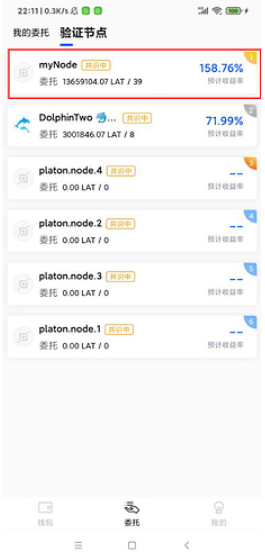
The page is an activity, and the corresponding logic class is the DelegateActivity class of the activity package. The page is accessed by clicking on the verification node, as shown below:
The next step is to explain the interface for sending delegates. For the purpose of learning more, instead of using the SDK’s automatic delegate interface, I have wrapped one directly in jsonrpc, so that we can write our own interface even if we encounter an SDK language that is not officially provided.
To call the delegate interface, we need to complete the following steps:
1, Find information about the delegate function: contains function name, list of parameters
2, Serialize the parameters of the calling function
3,Find the address of the delegated smart contract
We know from the official website that the delegate function is named: 1004, and the corresponding parameters are in order:
1, Delegation type. The parameter 0 is the free amount, 1 is the locked amount and is of type BigInt.
2, Delegated node ID. The type is a string.
3, Commissioned amount. The type is Bigint.
Serialize the node after the function call information was known. The form that serialises the parameters in the PlatON node is rlp. By referring to the serialisation method of the SDK, we can derive the serialisation code for this function as:
    /**
     * 委托lat
     */
    suspend fun Delegate(privateKey: String, nodeId: String, lat: String): PlatonReceiptInfo? {
        // solidity的序列化方式为RlpType, 从官网得知
        // 委托的函数名为 1004
        // 参数依次为委托类型, 委托节点Id, 委托lat的数量, 因此我们需要一次序列化参数
        val result = ArrayList<RlpType>()
        // 委托的函数名为1004
        with(result) {
            // 构造函数名
            add(RlpString.create(RlpEncoder.encode(RlpString.create(1004))))
            // 0: 自由金额; 1: 锁仓  默认自由金额即可
            add(RlpString.create(RlpEncoder.encode(RlpString.create(0L))))
            // 设置nodeId
            add(
                RlpString.create(
                    RlpEncoder.encode(
                        RlpString.create(
                            Numeric.hexStringToByteArray(
                                nodeId
                            )
                        )
                    )
                )
            )
            // 委托金额
            val von = Convert.toVon(lat, Convert.Unit.LAT).toBigInteger()
            add(RlpString.create(RlpEncoder.encode(RlpString.create(von))))
        }

        val data = Hex.toHexString(RlpEncoder.encode(RlpList(result)))
        // 委托的智能合约地址为: lat1zqqqqqqqqqqqqqqqqqqqqqqqqqqqqqqzsjx8h7
        return sendRawTransaction(
            privateKey, "lat1zqqqqqqqqqqqqqqqqqqqqqqqqqqqqqqzsjx8h7", 0,
            49920, data
        )
    }
Once the serialization information is complete, the parameters need to be sent to the smart contract. From the documentation on the official website we know that the address of the commissioned smart contract is:
lat1zqqqqqqqqqqqqqqqqqqqqqqqqqqqqqqzsjx8h7
The smart contract is called in the same way as a LAT is sent, the only difference is whether the data is empty or not, so we extract the logic of sendLATTO into a separate function sendRawTransaction. The code is as follows:
    private suspend fun sendRawTransaction(
        privateKey: String,
        toAddress: String,
        lat: Long,
        gas: Long,
        data: String
    ): PlatonReceiptInfo? {
        /**
         * 转换秘钥
         */
        val iPrivateKey =
            Numeric.toBigInt(privateKey)

        val keyPair = ECKeyPair.create(iPrivateKey)

        /**
         * 将秘钥转换成sdk使用的凭证类
         */
        val credentials: Credentials = Credentials.create(keyPair)

        /**
         * 设置gaslimit
         */
        val gasLimit = BigInteger.valueOf(gas)

        /**
         * 获取当前的gasprice
         */
        val gasPrice = GetGasPrice()

        /**
         * 获取交易数量用作nonce字段
         */
        val nonce: BigInteger = GetTransactionCount(credentials.address)

        /**
         * 将lat转换为von
         */
        val value = Convert.toVon(BigDecimal(lat), Convert.Unit.LAT).toBigInteger();
        /**
         * 构建交易类
         */
        val rawTransaction = RawTransaction.createTransaction(
            nonce,
            gasPrice,
            gasLimit,
            toAddress,
            value,
            data
        )

        /**
         * 使用秘钥对交易数据进行签名
         */
        val signedMessage =
            TransactionEncoder.signMessage(rawTransaction, 210309, credentials)

        /**
         * 将交易数据转换为16进制
         */
        val hexValue = Numeric.toHexString(signedMessage)

        val params = ArrayList<Any>()

        params.add(hexValue)
        /**
         * 发送给节点,返回为交易哈希
         */
        val platonResult = doCall("platon_sendRawTransaction", params)

        /**
         * 根据交易哈希获取交易收据
         */
        return GetTransactionReceipt(platonResult.result)
    }
Because the Gas Limit of sending LAT is different from that of executing the entrusted operation, this variable should be extracted into a parameter
Here I will demonstrate how to delegat 13 LATs (thanks to the students who deployed the pledge nodes on the test network). The interface is as follows:
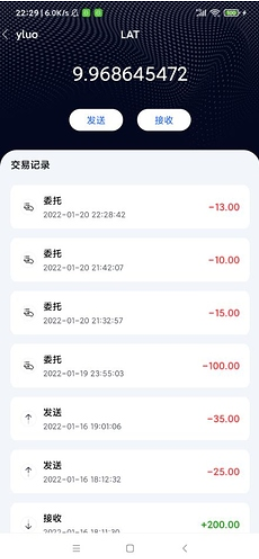
At this point, you can see the corresponding order record in the transaction history, as shown below:
Well, that’s it for this chapter, in the next chapter we’ll explain how to collect your rewards and redeem your orders.
The last few chapters have been quite code-heavy, which has caused some delays.
The URL of github: https://github.com/DQTechnology/Platon_DevGuideProject
Publisher:,Please indicate the source for forwarding:https://platonworld.org/?p=6859