In this chapter, we will import mnemonics, save secret keys, and reset passwords through mnemonics
Build a Page for Importing Mnemonics
In the page directory, create the file import-seed-phrase-page.vue. ssome codes are as follows:
<template>
<div class="import-seed-phrase-page vertical-only-layout">
<header-bar />
<div class="go-back" @click="onGoBack">< Back</div>
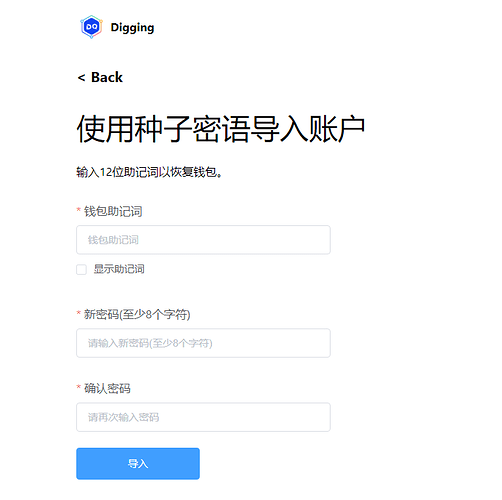
<page-title>使用种子密语导入账户</page-title>
<div class="text-block">
输入12位助记词以恢复钱包。
</div>
<el-form ref="importForm" :model="importInfo">
<el-form-item
prop="mnemonic"
label="钱包助记词"
:rules="[
{
required: true,
message: '助记词为12个单词',
validator: validator.ValidateMnemonic,
trigger: 'change'
}
]"
>
<el-input
v-if="!bShowSeedPhrase"
class="pwd-input"
type="password"
v-model="importInfo.mnemonic"
placeholder="钱包助记词"
/>
<el-input
v-else
type="textarea"
class="pwd-input"
rows="3"
resize="none"
placeholder="用空格分开每个单词"
v-model="importInfo.mnemonic"
>
</el-input>
<el-checkbox v-model="bShowMnemonic">显示助记词</el-checkbox>
</el-form-item>
<el-form-item
prop="newPassword"
label="新密码(至少8个字符)"
:rules="[
{
required: true,
message: '请输入新密码(至少8个字符)',
validator: validator.ValidatePassword
}
]"
>
<el-input
class="pwd-input"
type="password"
v-model="importInfo.newPassword"
placeholder="请输入新密码(至少8个字符)"
:minlength="8"
/>
</el-form-item>
<el-form-item
prop="confirmPassword"
label="确认密码"
:rules="[
{
required: true,
message: '请再次输入密码',
validator: validator.ValidatePassword
}
]"
>
<el-input
class="pwd-input"
type="password"
v-model="importInfo.confirmPassword"
placeholder="请再次输入密码"
:minlength="8"
/>
</el-form-item>
<el-form-item>
<el-button class="import-btn" type="primary" @click="onImport">导入</el-button>
</el-form-item>
</el-form>
</div>
</template>
The interface is as follows:

Next, let’s start writing logic. In order to reuse the code of generating secret keys through mnemonics in Chapter 4, we extract the code of generating secret keys in Chapter 4 into a tool class. Create file mnemonicUtil.js in src/util directory, as shown below:
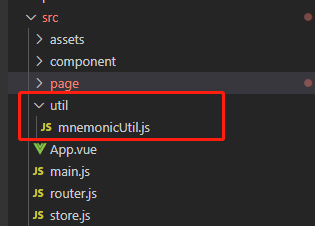
The code of mnemonicUtil.js is as below:
const bip39 = require("bip39");
const hdkey = require("hdkey");

export default class MnemonicUtil {
    // 生成秘钥的路径
    static hdPath = "m/44'/60'/0'/0/0";
    /**
     * 验证助记词是否有效
     * @param {助记词} mnemonic
     * @returns
     */
    static ValidateMnemonic(mnemonic) {
        let seedWords = mnemonic.split(" ");
        seedWords = seedWords.filter(word => {
            word = word.trim();
            return !!word;
        });
        return seedWords.length === 12;
    }
    /**
     *
     * @param {助记词} mnemonic
     * @returns
     */
    static async GeneratePrivateKeyByMnemonic(mnemonic) {
        // 这里先把助记词分割, 防止助记词之间有多个空格
        let seedWords = mnemonic.split(" ");
        //  然后再把分割好的单词 已一个空格合并成字符串
        mnemonic = seedWords.join(" ");

        let seed = await bip39.mnemonicToSeed(mnemonic);

        const hdSeed = hdkey.fromMasterSeed(seed);

        const privateKey = hdSeed.derive(MnemonicUtil.hdPath).privateKey.toString("hex");

        return privateKey;
    }
}
The code of seed-phrase-confirm-page.vue should be modified like below:
... 省略代码

import MnemonicUtil from "@/util/mnemonicUtil.js";
... 省略代码
// 确认生成私钥代码
        async onConfirm() {
          let privateKey = await MnemonicUtil.GeneratePrivateKeyByMnemonic(
                this.mnemonic
            )
        },
... 省略代码
There is no need to introduce bip32 and hdkey classes but mnemonicUtil.js in seed-phrase-confirm-page.vue.
Then we return to import-seed-phrase-page.vue, and the logic code of importing mnemonics is as follows:
... 省略代码
import MnemonicUtil from "@/util/mnemonicUtil.js";
... 省略代码
// 导入助记词代码
        onImport() {
            this.$refs.importForm.validate(vaild => {
                if (!vaild) {
                    return;
                }
                // 去掉密码的两边空格
                let newPassword = this.importInfo.newPassword.trim();
                let confirmPassword = this.importInfo.confirmPassword.trim();

                if (newPassword !== confirmPassword) {
                    this.$message.error("两次密码不一致");
                    return;
                }
                // 执行创建创建密码的动作
                this.doImport(newPassword);
            });
        },
      //
        async doImport(newPassword) {
            // 先保存好密码
            await this.digging.PasswordManager.CreatePassword(newPassword);
            //
            //  生成私钥
            let privateKey = await MnemonicUtil.GeneratePrivateKeyByMnemonic(
                this.importInfo.seedPhrase
            );
        },
It can be seen that mnemonic util can be directly introduced as long as the private key is generated through mnemonicUtil.js file. Before generating the secret key, you need to save the password.
The Function of Saving Secret Key
Open file background.js in directory public/js and add the following code (only the interface description is given here. For the specific implementation, please refer to the source code):
/**
 * 私钥管理类
 */
class PrivateKeyManager {
    // 存储私钥的键
    static privateKeyName = "privateKeys";
    // 存储当前选中的账号
    static curAccountKey = "currentAccount";
    /**
     *
     * @param {账号名} accountName 为了支持多个私钥,因为每个私钥都有一个名字
     * @param {私钥} privateKey
     * @param {是否强制导入} force 如果是强制导入的话, 会把之前所存储的私钥全部先删除,再执行导入
     */
    static async StorePrivateKey(account, privateKey, force);
    /**
     * 删除账号
     * @param {}} account
     * @returns
     */
    static async DeleteAccount(account) ;

    /**
     * 导出加密后的文件
     * @param {账号名} account
     */
    static async ExportKeyStore(account) ;
    /**
     * 导出私钥
     * @param {} account
     * @param {*} password
     * @returns
     */
    static async ExportPrivateKey(account, password);
    /**
     * 切换账号
     * @param {账号名} account
     */
    static async SwitchAccount(account);
    /**
     * 获取所有钱包地址列表
     */
    static async GetAccountList() ;

    /**
     * 判断是否有账号
     */
    static async HasAccount() ;

    /**
     * 获取当前选中的账号
     * @returns
     */
    static getCurrentAccount() ;
    /**
     * 保存当前选中的账号
     * @param {账号名} account
     * @returns
     */
    static storeCurrentAccount(account) ;

    /**
     * 保存加密后的私钥列表
     * @param {私钥列表} encryptPrivateKeys
     */
    static storePriateKeys(encryptPrivateKeys);
    /**
     * 获取所有私钥的对象
     * @returns
     */
    static getPrivateKeys();}
}
Be sure to usechrome.storage.local to save the private key, so that the saved information can only be accessed by the current plug-in.Finally, export PrivateKeyManager. The functions provided by this class include:
- Store Private Key
- Delete Account
- Export Key Store
- Export PrivateKey
- Switch Account
- Get Account List
- Has Account
Web3EthAccounts in SDK is used here. It can encrypt the private key into a keystore, which can be directly imported into other wallets for use.
Let’s explain how to use this class.
Open the seed-phrase-confirm-page.vue and changed the onConfirm code:
        async onConfirm() {
            let privateKey = await MnemonicUtil.GeneratePrivateKeyByMnemonic(this.mnemonic);

            let defaultAccount = "账号 1";
            // 调用PrivateKeyManager的StorePrivateKey接口保存私钥
            // 这里创建第一个账号默认为账号 1
            // 设置未强制导入, 这样可以把之前存在的账号一次性清空
            let res = await this.digging.PrivateKeyManager.StorePrivateKey(defaultAccount, privateKey, true);
            if (res.errCode !== 0) {
                this.$message.error(res.errMsg);
                return;
            }
            // 保存成功后, 把账号切换为刚刚导入的账号
            res = await this.digging.PrivateKeyManager.SwitchAccount(defaultAccount);
            if (res.errCode !== 0) {
                this.$message.error(res.errMsg);
                return;
            }
            this.$message.success("创建秘钥成功!");
        },
Then open the import-seed-phrase-page.vue and change te code of doImport as below:
        async doImport(newPassword) {
            // 先保存好密码
            await this.digging.PasswordManager.CreatePassword(newPassword);
            //
            //  生成私钥
            let privateKey = await MnemonicUtil.GeneratePrivateKeyByMnemonic(
                this.importInfo.seedPhrase
            );

            let defaultAccount = "账号 1";
            // 调用PrivateKeyManager的StorePrivateKey接口保存私钥
            // 这里创建第一个账号默认为账号 1
            // 设置未强制导入, 这样可以把之前存在的账号一次性清空
            let res = await this.digging.PrivateKeyManager.StorePrivateKey(
                defaultAccount,
                privateKey,
                true
            );
            if (res.errCode !== 0) {
                this.$message.error(res.errMsg);
                return;
            }
            // 保存成功后, 把账号切换为刚刚导入的账号
            res = await this.digging.PrivateKeyManager.SwitchAccount(defaultAccount);
            if (res.errCode !== 0) {
                this.$message.error(res.errMsg);
                return;
            }
            this.$message.success("导入秘钥成功!");
        }
The above is the function of exporting mnemonics and saving the generated secret key and the following is to improve the functions of generating mnemonic words and decrypting wallet pages
Add the Function of Generating Mnemonic Words Page and Saving Mnemonic Words into TXT File
Open the page seed-phrase-page.vue, add following codes:
/**
* 把助记词保存成txt文本
*/
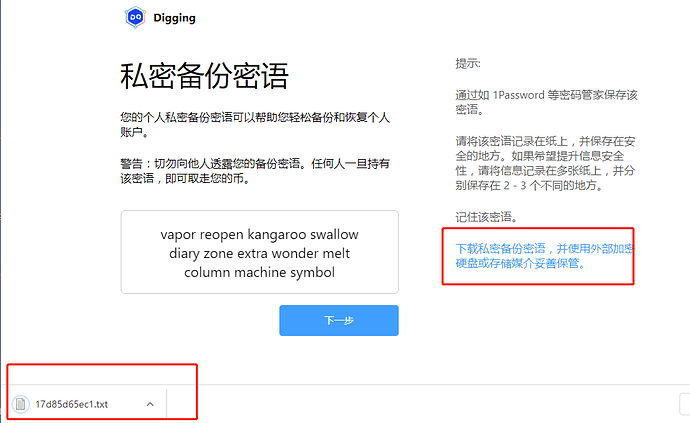
onSaveAsText() {
let blob = new Blob([this.mnemonic]);
let link = document.createElement("a");
link.href = window.URL.createObjectURL(blob);
link.download = MnemonicUtil.GenHexString() + ".txt";
link.click();
//释放内存
window.URL.revokeObjectURL(link.href);
},
So that when we click the text, the mnemonic words will be automatically saved into a TXT file and downloaded. The effect is as follows:
Added the Function of Resetting the Password by Exporting Mnemonics on the Unlock Page
Establish restore-vault-page.vue file in the page directory. Some codes are as follows:
<template>
    <div class="restore-vault-page vertical-only-layout">
        <header-bar />
        <div class="go-back" @click="onGoBack">< Back</div>
        <page-title>使用种子密语恢复个人账户</page-title>
        <div class="text-block">
            输入12位助记词以恢复钱包。
        </div>
        <el-form ref="importForm" :model="restoreInfo">
            <el-form-item
                prop="mnemonic"
                label="钱包助记词"
                :rules="[
                    {
                        required: true,
                        message: '助记词为12个单词',
                        validator: validator.ValidateMnemonic,
                        trigger: 'change'
                    }
                ]"
            >
                <el-input
                    type="textarea"
                    class="pwd-input"
                    rows="3"
                    resize="none"
                    placeholder="用空格分开每个单词"
                    v-model="restoreInfo.mnemonic"
                >
                </el-input>
            </el-form-item>
            <el-form-item
                prop="newPassword"
                label="新密码(至少8个字符)"
                :rules="[
                    {
                        required: true,
                        message: '请输入新密码(至少8个字符)',
                        validator: validator.ValidatePassword
                    }
                ]"
            >
                <el-input
                    class="pwd-input"
                    type="password"
                    v-model="restoreInfo.newPassword"
                    placeholder="请输入新密码(至少8个字符)"
                    :minlength="8"
                />
            </el-form-item>
            <el-form-item
                prop="confirmPassword"
                label="确认密码"
                :rules="[
                    {
                        required: true,
                        message: '请再次输入密码',
                        validator: validator.ValidatePassword
                    }
                ]"
            >
                <el-input
                    class="pwd-input"
                    type="password"
                    v-model="restoreInfo.confirmPassword"
                    placeholder="请再次输入密码"
                    :minlength="8"
                />
            </el-form-item>
            <el-form-item>
                <el-button class="import-btn" type="primary" @click="onImport">恢复</el-button>
            </el-form-item>
        </el-form>
    </div>
</template>
The page is shown in the figure below:

The logic of resetting the page is basically the same as that of importing mnemonic words. Refer to this page for specific code logic, which will not be described in detail here
Fix the bug that the mnemonic confirmation page can’t select when the word is repeated
When the generated mnemonic word is repeated, the same word cannot be selected. Therefore, the code of the mounted function of seed-phrase-confirm-page.vue needs to be modified as follows.
  mounted() {
        if (!this.mnemonic) {
            let mnemonic = bip39.generateMnemonic();
            this.$store.commit("SetMnemonic", mnemonic);
        }
        // 保存正确顺序的助记词
        let splitSeedWords = this.mnemonic.split(" ");

        this.orginSeedWords = [];
        // 这里给每一个单词排序号,避免有重复单词智能选择一个的问题
        for (let i = 0; i < splitSeedWords.length; ++i) {
            this.orginSeedWords.push({
                index: i,
                word: splitSeedWords[i]
            });
        }

        // 打算助记词的顺序, 这里 [...this.orginSeedWords] 复制数组

        this.seedWords = this.shuffle([...this.orginSeedWords]);
    },
Well, that’s all for this chapter. In the next chapter, we’ll learn to realize wallet transfer and view the transaction list
The URL of github: https://github.com/DQTechnology/Platon_DevGuideProject
This article is reproduced from https://forum.latticex.foundation/t/topic/5861