In this chapter, we would complete the transaction list, check whether the transfer is successful and export the wallet secret key.
Create transaction list page
Write the transaction list and transaction record into 2 different components respectively, then create pending pending-transaction-table.vue file in component directory, some codes are as follows:
<template>
    <div class="pending-tx-record">
        <el-table :data="datas" style="width: 100%" height="400">
            <el-table-column prop="txHash" label="交易哈希值" width="250">
                <template slot-scope="scope">
                    <span class="ellipsis" :title="scope.row.txHash">{{ scope.row.txHash }}</span>
                </template>
            </el-table-column>
            <el-table-column prop="blockNumber" label="区块"> </el-table-column>

            <el-table-column prop="to" label="接收地址" width="240">
                <template slot-scope="scope">
                    <span class="ellipsis" :title="scope.row.to">{{ scope.row.to }}</span>
                </template>
            </el-table-column>

            <el-table-column label="发送时间" width="240">
                <template slot-scope="scope">
                    <span>{{ timestampToStr(scope.row.timestamp) }}</span>
                </template>
            </el-table-column>

            <el-table-column prop="status" label="状态"> </el-table-column>

            <el-table-column prop="value" label="价值"> </el-table-column>
        </el-table>
    </div>
</template>
The fields displayed here are:
- 交易哈希 Transaction hash
- 接收地址 Receiving address
- 当前状态 Current state
- 发送时间 Sending time
- 所在区块 Block
- 发送LAT数量 Number of LATs sent
- 状态 Statuse There are two statuses: being confirmed and pending
Open the page main-page.vue and add the components
import pendingTransactionTable from "@/component/pending-transaction-table.vue";
Then use it
 <div class="transaction-record-container" v-if="tabIndex === 1">
      <pending-transaction-table :address="address" />
</div>
The effect is shown as below:
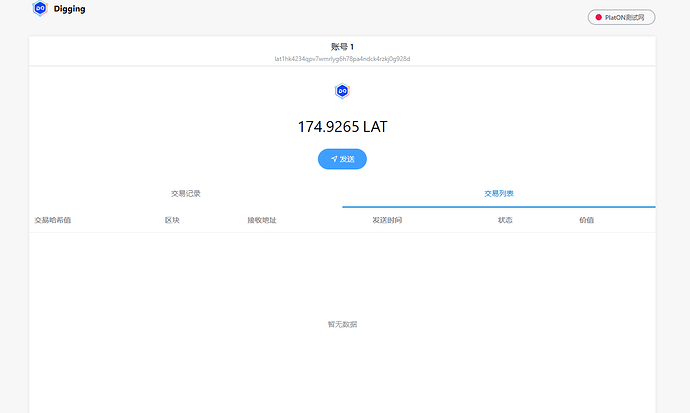

Logic for recording transactions
The data of the transaction list needs to be recorded by ourselves. Open the file background.js, find transactionmanager and add the following code:
- 1, add transaction records to get the function addTxRecord. The code is as follows:
    /**
     * 添加交易记录
     * @param {交易哈希} transactionHash
     * @param {交易数据} txData
     * @param {收据} receipt
     */
    static async addTxRecord(transactionHash, txData, receipt) {
        let web3 = TransactionManager.getWeb3Ins();
        // 以交易哈希作为key
        let txRcordInfo = {
            txHash: transactionHash,
            value: web3.utils.fromVon(txData.value, "lat"), // lat数量
            from: txData.from, // 发送人
            to: txData.to, // 接收人
            timestamp: new Date().getTime() // 发送时间
        };
        // 记录交易记录
        TransactionManager.pendingTxRecords[transactionHash] = txRcordInfo;

        if (receipt) {
            txRcordInfo.status = "确认中";
            txRcordInfo.blockNumber = receipt.blockNumber; // 记录所在块高
        } else {
            txRcordInfo.status = "待处理";
        }
        //  持久化交易记录
        await TransactionManager.persistTXRecord();
        // 启动监控器
        TransactionManager.startTxMonitor();
    }
- 2, Modify the code of SendLATTO function as follows:
    /**
     * 发送lat
     * @param {lat数量} lat
     * @param {接收地址} toAddress
     */
    static async SendLATTO(lat, account, toAddress) {
   ... 省略代码

        let signTxtData = await web3.platon.accounts.signTransaction(txData, walletInfo.privateKey);
        let txInfo = await web3.platon.sendSignedTransaction(signTxtData.rawTransaction);
        // 获取的收据
        let receipt = await web3.platon.getTransactionReceipt(txInfo.transactionHash);

        if (receipt === null) {
            // pending状态
            // 持久化交易记录
            TransactionManager.addTxRecord(txInfo.transactionHash, txData, receipt);
            return {
                errCode: WARNNING,
                errMsg: "交易等待处理中"
            };
        }

        // 如果交易失败,则直接返回
        if (!receipt.status) {
            return {
                errCode: Error,
                errMsg: "发送失败!",
                data: {
                    txHash: txInfo.transactionHash,
                    receipt: receipt
                }
            };
        }
        // 持久化交易记录
        TransactionManager.addTxRecord(txInfo.transactionHash, txData, receipt);
        return {
            errCode: SUCCESS,
            data: {
                txHash: txInfo.transactionHash,
                receipt: receipt
            }
        };
    }
This function adds a logic to call addTxRecord. It should be noted that if the transaction receipt is null, the transaction is in the pending state
- 3, Add a function to monitor transaction status
After the transaction is recorded, we need to start a timer to regularly monitor the status of each transaction. The code is as follows:
   static startTxMonitor() {
        // 监控器已经在 运行中,不重复运行
        if (TransactionManager.isMonitoring) {
            return;
        }
        //正在监控中
        TransactionManager.isMonitoring = true;

        TransactionManager.checkTXRecordStatus();
    }
    // 检查交易记录状态
    static checkTXRecordStatus() {
        setTimeout(async () => {
            let txHashList = Object.keys(TransactionManager.pendingTxRecords);
            if (txHashList.length === 0) {
                // 当前没有待确认的交易列表
                // 把监控状态设置为false然后直接返回
                TransactionManager.isMonitoring = false;
                return;
            }
            let web3 = TransactionManager.getWeb3Ins();
            // 获取当前块高
            let blockNumber = await web3.platon.getBlockNumber();
            for (let i = 0; i < txHashList.length; ++i) {
                let txHash = txHashList[i];
                // 获取交易记录
                let txRcordInfo = TransactionManager.pendingTxRecords[txHash];
                if (txRcordInfo.status === "确认中") {
                    // 设置确认块高为6, 则认为交易已经成功!
                    if (blockNumber - txRcordInfo.blockNumber > 6) {
                        // 已经确认的,则从监控列表中删除
                        delete TransactionManager.pendingTxRecords[txHash];
                        continue;
                    }
                } else if (txRcordInfo.status === "待处理") {
                    // 获取的收据
                    let receipt = await web3.platon.getTransactionReceipt(txHash);
                    // 还是没有获取到收据,交易还在待处理中,需要处理
                    if (receipt === null) {
                        continue;
                    }
                    // 判断确认块高是否已经超过6,如果超过6则已经交易成功
                    if (blockNumber - receipt.blockNumber > 6) {
                        delete TransactionManager.pendingTxRecords[txHash];
                        continue;
                    }

                    // 确认块高未超过6, 交易记录状态编程确认中
                    txRcordInfo.blockNumber = receipt.blockNumber; // 记录所在块高
                    txRcordInfo.status = "确认中";
                }
            }

            //  持久化交易记录
            await TransactionManager.persistTXRecord();
            // 继续监听
            TransactionManager.checkTXRecordStatus();
            // 10s检查一次
        }, 1000);
The monitor would checks the status once every 10 seconds. If the confirmation block height is greater than 6, the transaction would be considered to be completed
- 4, Add a plug-in to automatically load transaction records at startup
Because the plug-in may be closed when there are incomplete transactions, the plug-in must continue to listen to incomplete transactions when starting. The code is as follows:
    /**
     * 插件启动时,需要从store加载未完成的交易记录
     */
    static LoadPendingTxRecord() {
        chrome.storage.local.get(["pendingTxRecords"], res => {
            let records = res["pendingTxRecords"];
            // 没有交易记录直接返回
            if (!records) {
                return;
            }
            TransactionManager.records = records;

            // 启动监控器

            TransactionManager.startTxMonitor();
        });
    }
The method of calling this function is as follows:
// 加载交易记录
TransactionManager.LoadPendingTxRecord();
// 导出PasswordManager
window.digging = {
    PasswordManager,
    PrivateKeyManager,
    TransactionManager
};
- 5, add a function to get the transaction list
    /**
     * 获取交易列表
     * @param {钱包地址} address
     */
    static GetPendingRecords(address) {
        let txHashList = Object.keys(TransactionManager.pendingTxRecords);
        let txRecords = [];
        for (let i = 0; i < txHashList.length; ++i) {
            let txHash = txHashList[i];
            // 获取交易记录
            let txRcordInfo = TransactionManager.pendingTxRecords[txHash];
            if (txRcordInfo.from === address) {
                txRecords.push(txRcordInfo);
            }
        }
        return txRecords;
    }
Through this function, you can get the transaction list of each wallet.
- 6, Write the logic of pending-transaction-table.vue, code as follows:
        loadData() {
            //
            this.datas = this.digging.TransactionManager.GetPendingRecords(this.address);

            if (this.isPooling) {
                return;
            }
            this.isPooling = true;

            this.loopPullData();
        },

        loopPullData() {
            //  做退出标记,否则及时页面销毁了,也会一直执行
            if (this.bStop) {
                return;
            }
            setTimeout(() => {
                this.loadData();
            }, 10000);
        }
A timer is used here to get the transaction list regularly. It should be noted that a flag of drawing must be added to the timer, otherwise the timer will continue to execute the command even if the page is destroyed.
After writing the logic, we should send a transfer, and the transaction list is as follows
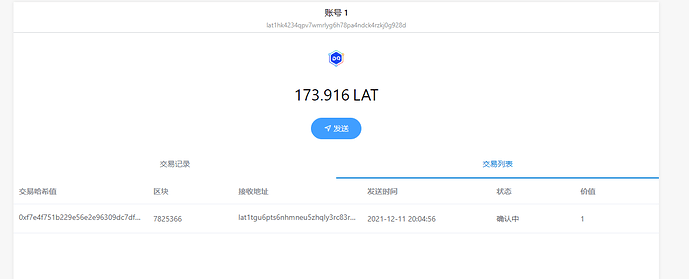
After about 10s, the transaction will be completed, and then the list will shown as empty
Then we complete the creation of the remaining functions,
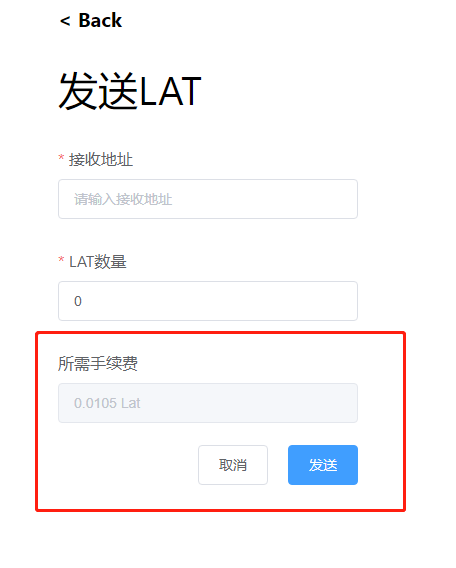
Display transaction charges
Add code shown below in TransactionManager:
    /**
     * 计算手续费
     */
    static async CalcGasUsed() {
        let web3 = TransactionManager.getWeb3Ins();
        let gasPrice = await web3.platon.getGasPrice();
        //
        // 手续费 = gasPrice * gasLimit  gasLimit设置为= 21000;
        // 这里需要把值换成字符串,
        return web3.utils.fromVon((gasPrice * 21000) + "", "lat");
    }
Open the file send-lat-page.vue and add codes shown bellow in mount function:
    async mounted() {
        this.sendInfo.gasfee = (await this.digging.TransactionManager.CalcGasUsed()) + " Lat";
    },
The effect is shown as follow:
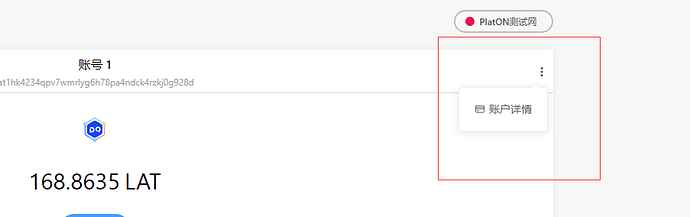
Add the function of exporting secret keys
Add these codes in the file main-page.vue:
<div class="horzontal-layout menu-bar ">
    <div class="flex-1"></div>
    <div class="vertical-layout flex-1 flex-center ">
        <span class="account">{{ accountName }}</span>
        <span class="address">{{ address }}</span>
    </div>
    <div class="flex-1 horzontal-layout flex-center">
        <span class="flex-1"></span>
        <el-dropdown trigger="click">
            <i title="账户选项" class="el-icon-more more-btn"></i>
            <el-dropdown-menu slot="dropdown">
                <el-dropdown-item icon="el-icon-bank-card"
                    >账户详情</el-dropdown-item
                >
            </el-dropdown-menu>
        </el-dropdown>
    </div>
</div>
The effect is shown as follow:
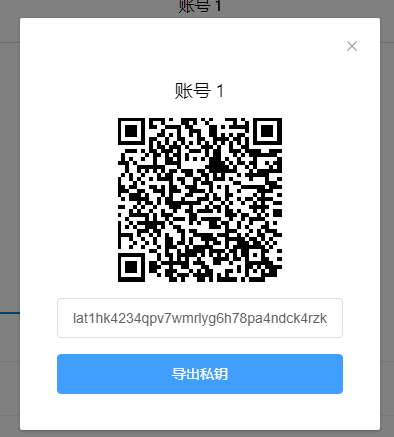
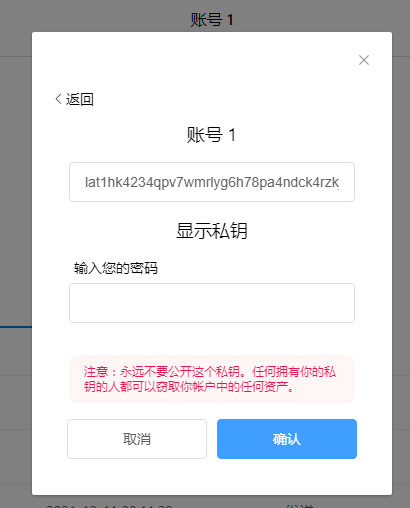
Then write the page to export the secret key. Add account-detail-info.vue page in component Directory, Some codes are as follows:
<template>
    <div class="account-detail-info">
        <div v-show="!showExport">
            <div class="horzontal-layout flex-center" style="margin-bottom:16px;">
                <span style="font-size:18px;color: black;"> {{ accountName }}</span>
            </div>
            <div class="horzontal-layout flex-center" style="margin-bottom:16px;">
                <div class="qrCode" ref="qrCodeDiv"></div>
            </div>

            <div class="horzontal-layout flex-center" style="margin-bottom:16px;">
                <el-input v-model="address" style=" width: 286px;" />
            </div>

            <div class="horzontal-layout flex-center" style="margin-bottom:6px;">
                <el-button class="export-btn" type="primary" @click="showExport = true"
                    >导出私钥</el-button
                >
            </div>
        </div>
        <div v-show="showExport">
            <div class="horzontal-layout" style="margin-bottom:16px;">
                <span
                    style="color: black;"
                    @click="showExport = false"
                    class="pointer el-icon-arrow-left"
                    >返回</span
                >
            </div>

            <div class="horzontal-layout flex-center" style="margin-bottom:16px;">
                <span style="font-size:18px;color: black;"> {{ accountName }}</span>
            </div>
            <div class="horzontal-layout flex-center" style="margin-bottom:16px;">
                <el-input v-model="address" style=" width: 286px;" />
            </div>
            <div class="horzontal-layout flex-center" style="margin-bottom:16px;">
                <span style="font-size:18px;color: black;"> 显示私钥</span>
            </div>

            <template v-if="!privateKey">
                <div class="horzontal-layout " style="margin-bottom:6px;">
                    <span style="color: black;margin-left: 22px;"> 输入您的密码</span>
                </div>
                <div class="horzontal-layout flex-center" style="margin-bottom:16px;">
                    <el-input type="password" v-model="password" style=" width: 286px;" />
                </div>
            </template>
            <template v-else>
                <div class="horzontal-layout " style="margin-bottom:6px;">
                    <span style="color: black;margin-left: 22px;"> 这是您的私钥</span>
                </div>
                <div class="horzontal-layout flex-center">
                    <el-input
                        class="private-key-password-display-textarea"
                        type="textarea"
                        v-model="privateKey"
                        rows="2"
                        resize="none"
                    />
                </div>
            </template>

            <div class="horzontal-layout flex-center">
                <div class="private-key-password-warning">
                    注意:永远不要公开这个私钥。任何拥有你的私钥的人都可以窃取你帐户中的任何资产。
                </div>
            </div>

            <div class="horzontal-layout flex-center" style="margin-bottom:6px;">
                <el-button class="bar-btn" @click="showExport = false"> 取消</el-button>

                <el-button class="bar-btn" type="primary" @click="onExportPrivateKey"
                    >确认</el-button
                >
            </div>
        </div>
    </div>
</template>
To generate the QR code of the wallet address, you need to install the qrcodejs2 library. Open the console under the project directory and enter the NPM install qrcodejs2 command.Use this component as a dialog box on the page main-page.vue. The code is as follows:
       <el-dialog
            v-if="bShowAccountDlg"
            width="360px"
            :visible.sync="bShowAccountDlg"
            append-to-body
        >
            <account-detail-info :accountName="accountName" :address="address" />
        </el-dialog>
The page would looks like this:
Well, that’s the end of this chapter. In the next chapter, we would realize the pledge lat and receive the pledge reward
The URL of github: https://github.com/DQTechnology/Platon_DevGuideProject
This article is reproduced from https://forum.latticex.foundation/t/topic/5892