In this chapter we will learn how to generate a secret key from a mnemonic and save it as a file
Create a page to confirm mnemonics
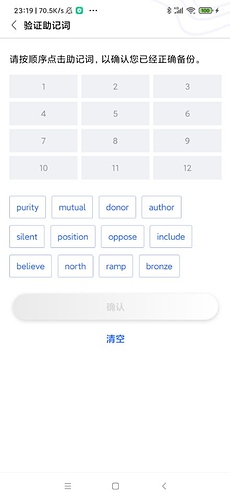
For the specific layout code, see the file res/layout/activity_verify_mnemonic_phrase.xml
The page effect is as follows:

Then add the VerifyMnemonicPhraseActivity class to the Activity directory, the code is parsed as follows:
    /**
     * 存储单词信息
     */
    data class WordInfo(
        var checked: Boolean,
        var mnemonic: String, // 助记词
        val waitSelectIndex: Int, // 在待选单词列表的索引
        var showWordIndex: Int // 选中单词的索引
    )
Create WordInfo class to store the following information about the current word:
1, the selected state
2, the word itself
3, the index of the word in the selected list
4, the index of the word in the selected list
In the initUI, we will get the words that WalletManager has created, and then we will display the order of the words in the list to be selected, the code is as follows:
        /**
         * 获取创建钱包的信息
         */
        val createWalletInfo = WalletManager.GetCreateWalletSession()

        /**
         * 获取助记词,如果助记词没有则1s关闭页面
         */
        val mnemonicWords = createWalletInfo?.mnemonicWords

        if (mnemonicWords == null) {
            ToastUtil.showLongToast(this, "助记词为空")
            this.finish()
            lifecycleScope.launch {
                /**
                 * 1s后关闭页面
                 */
                delay(1000)
                this@VerifyMnemonicPhraseActivity.finish()
            }
            return
        }
        /**
         * 保存正确顺序的助记词
         */
        originMnemonicWordList = mnemonicWords
        /**
         * 打乱助记词的顺序
         */
        val shuffledMnemonicWords = mnemonicWords.shuffled()
        /**
         * 显示待选助记词
         */
        showMnemonicWords(shuffledMnemonicWords)
The code to showMnemonicWords is as follows:
    /**
     * 打算的助记词显示的待选单词列表
     */
    private fun showMnemonicWords(shuffledMnemonicWords: List<String>) {
        bindding.flAll.removeAllViews()
        shuffledMnemonicWords.forEachIndexed { index, s ->
            /**
             * 构建助记词信息对象
             * 因为单词没有被选中,因此序选中索引都设置为-1
             */
            val dataEntity = WordInfo(false, s, index, -1)
            /**
             * 构建好的单词信息全部存到待选表
             */
            waitSelectWordInfoMap[index] = dataEntity

            bindding.flAll.addView(createAllItemView(dataEntity))
        }
    }
Use this method to build each word information WordInfo object, and then use createAllItemView, create the corresponding code to be selected UI element TextView, the method code is as follows:
    /**
     * 创建待续单词的UI元素
     */
    private fun createAllItemView(
        dataEntity: WordInfo
    ): TextView? {
        val textView = TextView(this)
        textView.text = dataEntity.mnemonic
        textView.gravity = Gravity.CENTER
        textView.isAllCaps = false

        waitSelectTVMnemonicList.add(textView)

        textView.setTextSize(TypedValue.COMPLEX_UNIT_SP, 14f)

        textView.setBackgroundResource(R.drawable.bg_shape_verify_mnemonic_n)
        textView.setTextColor(ResourceUtil.GetColor(R.color.color_316def))

        val paddingLeftAndRight: Int = DensityUtil.DP2PX(this, 12f)
        val paddingTopAndBottom = 0
        ViewCompat.setPaddingRelative(
            textView,
            paddingLeftAndRight,
            paddingTopAndBottom,
            paddingLeftAndRight,
            paddingTopAndBottom
        )
        val layoutParams = FlexboxLayout.LayoutParams(
            ViewGroup.LayoutParams.WRAP_CONTENT,
            DensityUtil.DP2PX(this, 38F)
        )
        val marginRight: Int = DensityUtil.DP2PX(this, 10F)
        val marginTop: Int = DensityUtil.DP2PX(this, 12F)
        layoutParams.setMargins(0, marginTop, marginRight, 0)
        textView.layoutParams = layoutParams
        return textView
    }
Put the selected word and the selected word in the array chain, so that the index can directly get the corresponding element. The code is as follows:
    /**
     *
     */
    private fun initUI() {
   ...省略代码
        /**
         * 把显示选中助记词的ui对象存储成列表, 这样可以通过索引直接获取对应的UI对象
         */
        showTVMnemonicList.add(bindding.tvMnemonic1)
        showTVMnemonicList.add(bindding.tvMnemonic2)
        showTVMnemonicList.add(bindding.tvMnemonic3)
        showTVMnemonicList.add(bindding.tvMnemonic4)
        showTVMnemonicList.add(bindding.tvMnemonic5)
        showTVMnemonicList.add(bindding.tvMnemonic6)
        showTVMnemonicList.add(bindding.tvMnemonic7)
        showTVMnemonicList.add(bindding.tvMnemonic8)
        showTVMnemonicList.add(bindding.tvMnemonic9)
        showTVMnemonicList.add(bindding.tvMnemonic10)
        showTVMnemonicList.add(bindding.tvMnemonic11)
        showTVMnemonicList.add(bindding.tvMnemonic12)
    }
The initialization of the selected word event is in the initEvent. The code is as follows:
    /**
     *
     */
    private fun initEvent() {
        /**
         *初始化显示选择的助记词事件
         */
        showTVMnemonicList.forEachIndexed { index, textView ->

            textView.setOnClickListener {
                selectWord(index, false)
            }
        }
        /**
         * 初始化等待选择的助记词事件
         */
        waitSelectTVMnemonicList.forEachIndexed { index, textView ->
            textView.setOnClickListener {
                selectWord(index, true)
            }
        }
        /**
         * 生成秘钥
         */
        bindding.sbtnSubmit.setOnClickListener {
            genPrivateKey()
        }
        /**
         * 清空所有选中的单词
         */
        bindding.btnEmpty.setOnClickListener {

            /**
             * 选中的单词都设置为空
             */
            showTVMnemonicList.forEachIndexed { index, textView ->

                textView.text = "";

                val dataEntity: WordInfo? = selectWordInfoMap[index]
                if (dataEntity != null) {
                    dataEntity.checked = false
                }
            }
            /**
             * 重新显示设置的单词
             */
            waitSelectTVMnemonicList.forEachIndexed { index, textView ->
                textView.setBackgroundResource(R.drawable.bg_shape_verify_mnemonic_n)
                textView.setTextColor(ResourceUtil.GetColor(R.color.color_316def))
            }
            curEmptyIndex = 0
            selectWordInfoMap.clear()
            bindding.sbtnSubmit.isEnabled = false
        }
    }
Here we have the following code for the method selectWord:
    /**
     * 处理单词的点击事件
     */
    private fun selectWord(index: Int, isWaitSelect: Boolean) {
        /**
         * 通过isWaitSelect判断,index获取单词信息对象是从待选对象获取,还是已选对象获取
         */
        val wordInfo: WordInfo? = if (isWaitSelect) {
            waitSelectWordInfoMap[index]
        } else {
            selectWordInfoMap[index]
        }

        if (wordInfo == null) {
            return
        }

        if (isWaitSelect) {
            /**
             * 如果点击的是待选单词列表,那每次都取反
             */
            wordInfo.checked = !wordInfo.checked
        } else {
            if (wordInfo.showWordIndex == -1) {
                return
            }
            /**
             * 如果点击的是已选单词列表,则每次则认为是取消选中
             */
            wordInfo.checked = false
        }
        /**
         * 获取待选单词的UI
         */
        val waitSelectMnemonicTV = waitSelectTVMnemonicList[wordInfo.waitSelectIndex]

        if (!wordInfo.checked) {
            // 取消选中词
            waitSelectMnemonicTV.setBackgroundResource(R.drawable.bg_shape_verify_mnemonic_n)
            waitSelectMnemonicTV.setTextColor(ResourceUtil.GetColor(R.color.color_316def))
            selectWordInfoMap.remove(wordInfo.showWordIndex)
            val showMnemonicTV = showTVMnemonicList[wordInfo.showWordIndex]
            showMnemonicTV.text = ""

            /**
             * 如果取消的位置索引比当前的空位置的索引小,则更新
             */
            if (wordInfo.showWordIndex < curEmptyIndex) {
                curEmptyIndex = wordInfo.showWordIndex
            }

            wordInfo.showWordIndex = -1
            bindding.sbtnSubmit.isEnabled = false
        } else {
            // 选中单词
            waitSelectMnemonicTV.setBackgroundResource(R.drawable.bg_shape_verify_mnemonic_h)
            waitSelectMnemonicTV.setTextColor(ResourceUtil.GetColor(R.color.color_b6bbd0))


            wordInfo.showWordIndex = curEmptyIndex

            selectWordInfoMap[wordInfo.showWordIndex] = wordInfo

            /**
             * 寻找下一个为空的位置
             */
            findNextEmptyIndex()

            val showMnemonicTV = showTVMnemonicList[wordInfo.showWordIndex]

            showMnemonicTV.text = wordInfo.mnemonic

            // 选完单词后,创建按钮设置为可用
            if (selectWordInfoMap.size == originMnemonicWordList.size) {
                bindding.sbtnSubmit.isEnabled = true
            }
        }
    }
Here the variable curEmptyIndex is used to indicate the position of the next selected word. After the word is selected, the secret key is generated, the method is genPrivateKey, and the code is as follows:
    /**
     * 生成密码
     */
    private fun genPrivateKey() {
        originMnemonicWordList.forEachIndexed { index, s ->

            val dataEntity = selectWordInfoMap[index];
            if (dataEntity == null) {
                ToastUtil.showLongToast(this, "助记词顺序不正确, 请重新选择")
                return@forEachIndexed
            }

            if (s != dataEntity.mnemonic) {
                ToastUtil.showLongToast(this, "助记词顺序不正确, 请重新选择")
                return@forEachIndexed
            }
            if (!WalletManager.GenerateWallet()) {

                ToastUtil.showLongToast(this, "生成钱包失败")
                return@forEachIndexed
            }
            ToastUtil.showLongToast(this, "生成钱包成功!")

        }
    }
This method will determine whether the order of the selected words is correct, and if so, call the GenerateWallet method of the WalletManager class to generate the wallet, which is as follows:
    /**
     * 生成钱包
     */
    fun GenerateWallet(): Boolean {
        //
        val createWalletInfo = GetCreateWalletSession() ?: return false
        // 1,把助记词组合成空格隔开的字符串
        val mnemonic = createWalletInfo.mnemonicWords.joinToString(" ")
        // 2.生成种子
        val seed = JZMnemonicUtil.generateSeed(mnemonic, null)
        // 3. 生成根Keystore root private key 树顶点的master key ;bip32
        val rootPrivateKey = HDKeyDerivation.createMasterPrivateKey(seed)
        // 4. 由根Keystore生成 第一个HD 钱包
        val dh = DeterministicHierarchy(rootPrivateKey)
        // 5. 定义父路径 H则是加强
        val parentPath = HDUtils.parsePath(PATH)
        // 6. 由父路径,派生出第一个子Keystore "new ChildNumber(0)" 表示第一个(PATH)
        val child: DeterministicKey = dh.deriveChild(parentPath, true, true, ChildNumber(0))
        val ecKeyPair = ECKeyPair.create(child.privKeyBytes)
        // 7. 删除当前创建钱包的信息
        clearCreateWalletSession()
        // 8. 存储钱包
        return storePrivateKey(createWalletInfo, ecKeyPair)
    }
Here hd’s wallet generation path is the same as ATON:val PATH = “M/44H/486H/0H/0”(Have you noticed that the PATH used here is different from the browser version? So is the secret key generated by the same helper word in the browser version and Anroid the same? If not, how to solve it?) After generating the secret key, you need to persist the secret key, which is directly stored as a file here. The storePrivateKey method code of WalletManager is as follows::
    /**
     * 存储私钥
     */
    private fun storePrivateKey(
        createWalletInfo: CreateWalletSessionInfo,
        ecKeyPair: ECKeyPair
    ): Boolean {
        return try {

            val context = DiggingApplication.context
            // 生成钱包文件
            val walletFile =
                Wallet.create(createWalletInfo.password, ecKeyPair, N_STANDARD, P_STANDARD)

            val objectMapper = ObjectMapper()
            // 将钱包文件序列化为json字符串
            val keyFileContent = objectMapper.writeValueAsString(walletFile)

            // 写入文件
            FileUtil.WriteStringToFile(context.filesDir,"$WalletStorePath/${createWalletInfo.walletName}.json", keyFileContent)
            true
        } catch (e: Exception) {
            false
        }
    }
Finally, you have to find the stored wallet file under the App path, as shown below:

The contents of the file are as follows:
可点击key和value值进行编辑
{
    "address":{
        "mainnet":"lat1mpxc2j5z0ttqna8xtcahskehcerc03gy7z25aw",
        "testnet":"lax1mpxc2j5z0ttqna8xtcahskehcerc03gy38cmnp"
    },
    "id":"7aa0516c-f9cb-495d-96f9-28cfc088d997",
    "version":3,
    "crypto":{
        "cipher":"aes-128-ctr",
        "cipherparams":{
            "iv":"d058c496292dd2100051876274732597"
        },
        "ciphertext":"e8ec7a89b59cc10363108d190c7daab4206a001a27bdcbdb9f71828afe9e88bd",
        "kdf":"scrypt",
        "kdfparams":{
            "dklen":32,
            "n":16384,
            "p":1,
            "r":8,
            "salt":"a114c2af5fd1e583fb0bdc7ed687efca823e34b300784ea92a0b292c2871e93e"
        },
        "mac":"f00da8599adad9d33617eb54e958eb780535019a482df50797df3773377b02c6"
    }
}
Well, that’s it for this chapter, in the next chapter we will finish importing the secret key function.
The URL of github: https://github.com/DQTechnology/Platon_DevGuideProject
Links to previous Andorid articles
跟Dex学PlatON应用开发–Android篇(一)
跟Dex学PlatON应用开发–Android篇(二)
跟Dex学PlatON应用开发–Android篇(三)
This article is reproduced from https://forum.latticex.foundation/t/topic/5967